Visualizing your dream property shouldn’t require a leap of faith. At Zlendo Realty.com, our 3D visualization tool bridges the gap between a flat 2D floor plan and a finished home, giving you a realistic perspective on every design choice.
Advanced Immersive Features in Zlendo Realty 3D #
| Feature | Description | How to Use |
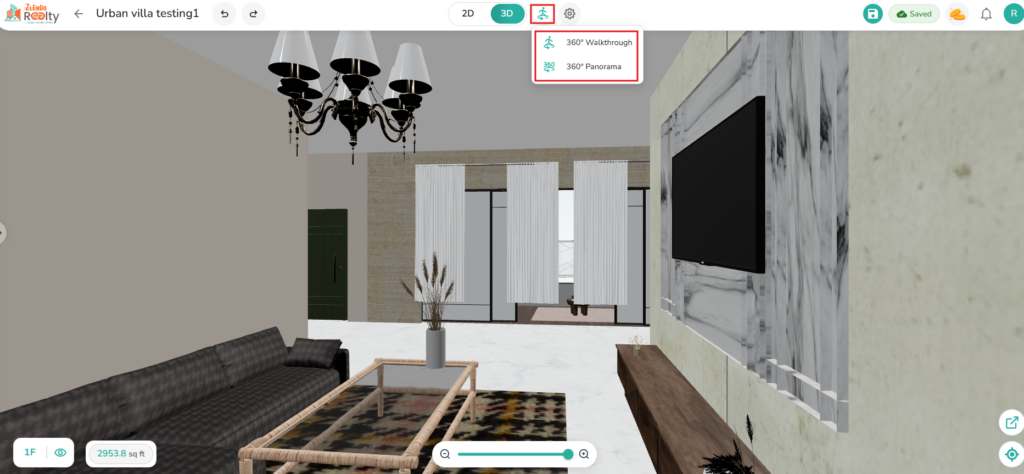
| 360° Walkthrough | A first-person “joystick” style navigation. | Click the Person Icon. Use on-screen controls or arrows to “walk” through the house. |
| 360° Panorama | Creates a fixed-point spherical view. | Select Panorama Mode to view a Room end-to-end. |
| VR Mode | Full immersion using a VR headset. | Tap the VR Goggles icon on your mobile device and insert it into a compatible headset. |
Switching from 2D Mode to 3D #
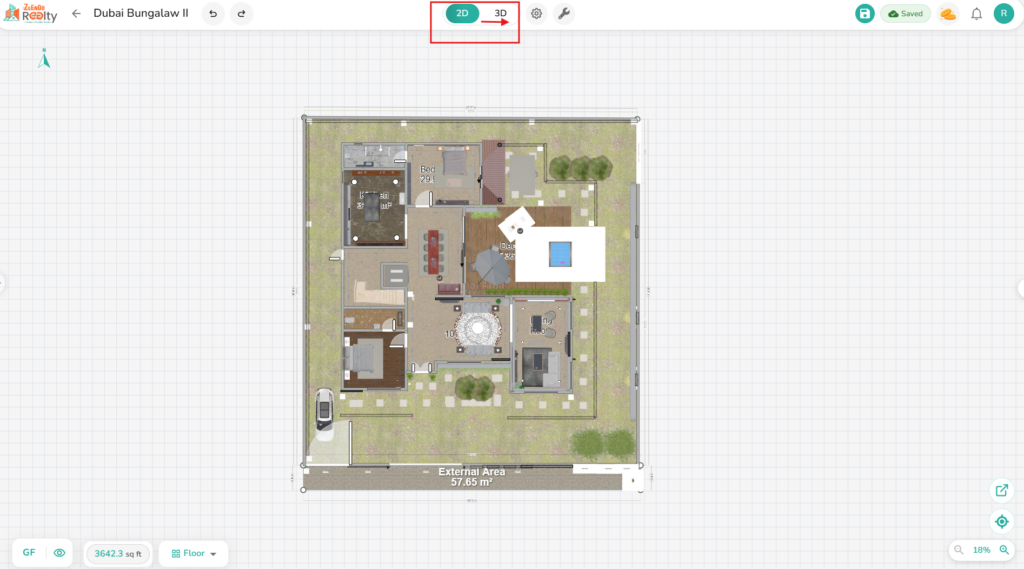
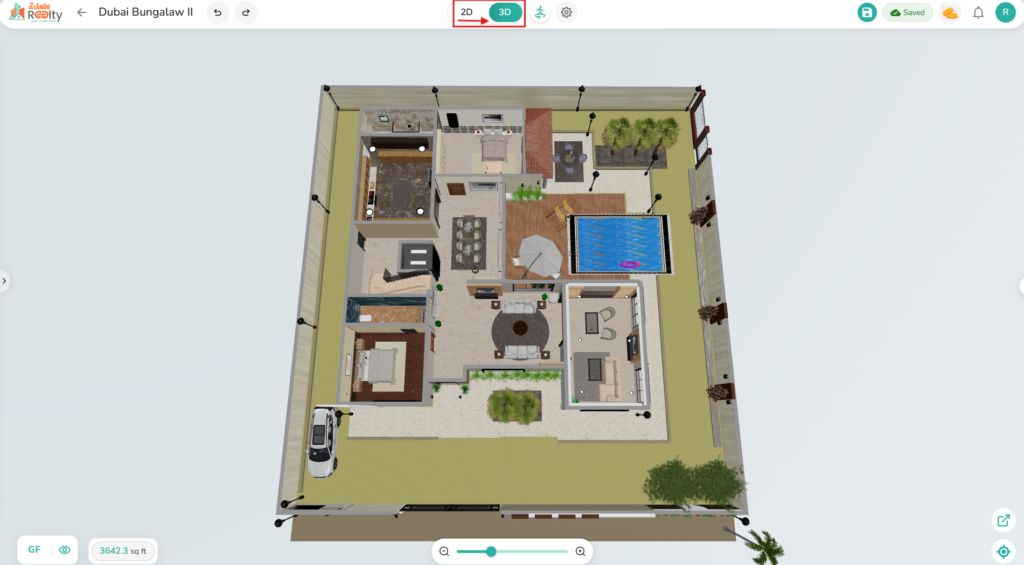
While 2D is perfect for technical precision and measurements, 3D is where your design comes to life. We recommend switching modes frequently during your workflow.
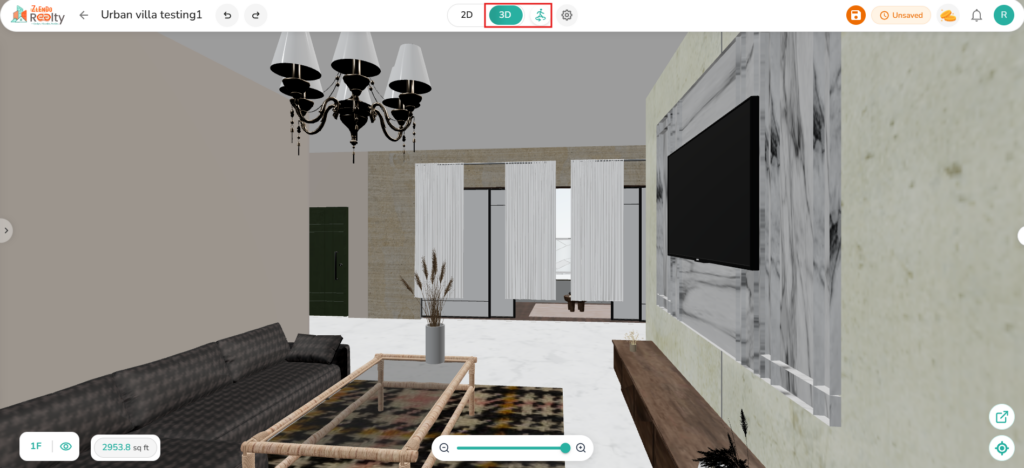
On the Workspace top menu ribbon, Click the Mode Switch Button (labeled “2D” / “3D”) to instantly toggle from 2D to 3D Mode.
💡 Zlendo Realty TIP: Use 3D View to Verify
Use 2D for “The Build” (drawing walls and placing structural elements) and 3D for “The Aesthetic” (choosing textures and fine-tuning decor).
Spatial Flow: Does the furniture placement feel natural or cluttered?
View in Multi-level Floors with roof.
Color Harmony: Do your chosen palettes look as good under “lighting” as they do in the swatch?
Scale & Proportion: Are the windows and doors positioned correctly for the best views?
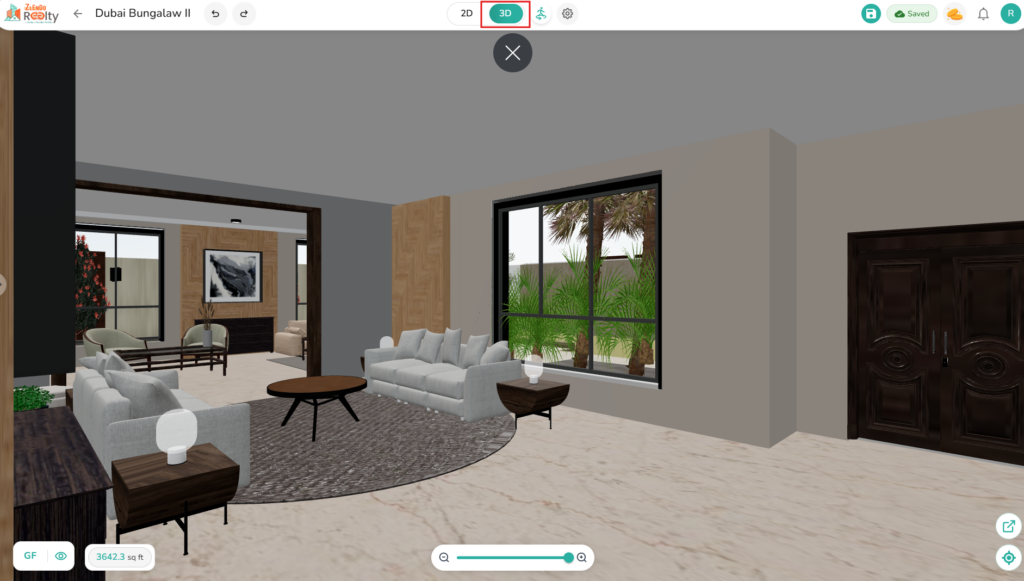
Editing in 3D #
Viewing Multi-Level Floors #
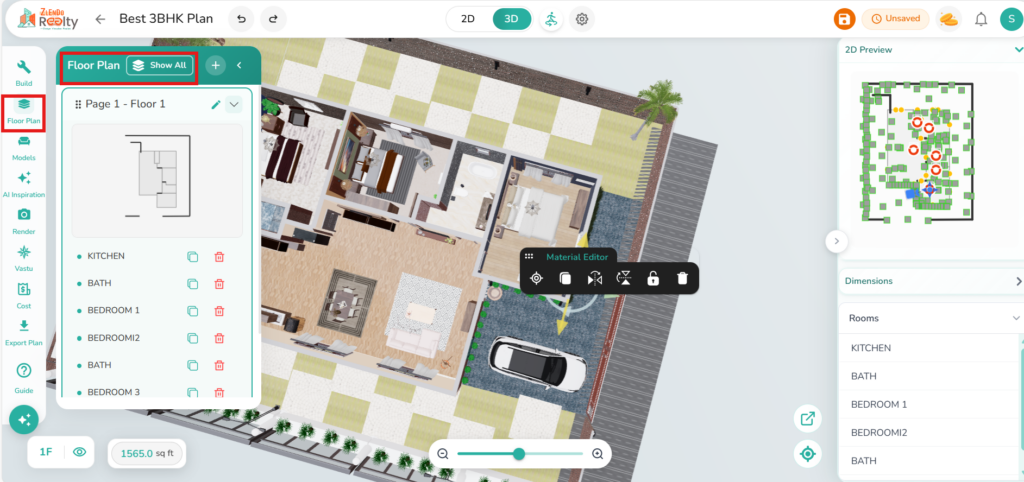
In 3D you can view all floors in the plan together.
To view all floors and the roofs in the 3D view: Workspace tool bar –> Click on Floor Plan –> Show All
Change Materials/Items #
Experiment with finishes instantly.
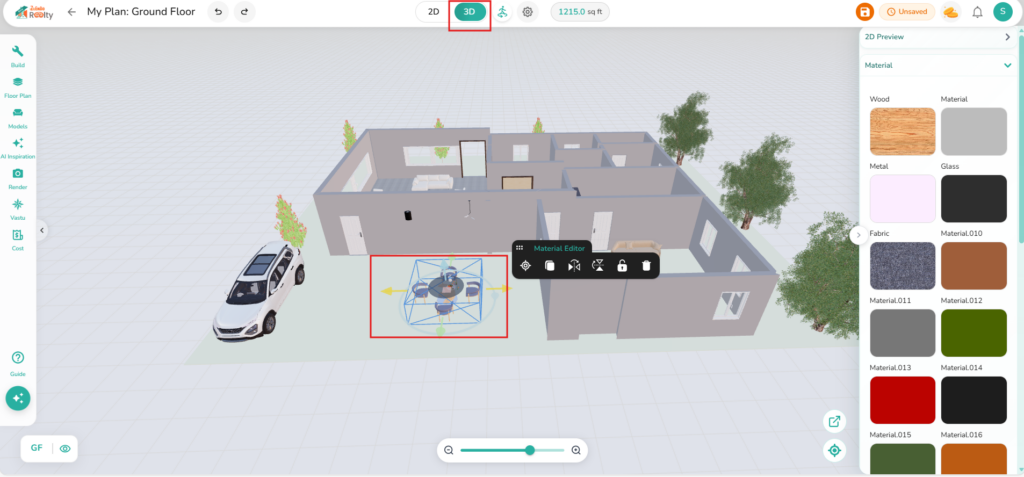
Select the object or surface (wall, floor, or furniture) you wish to edit.
Click to open the Materials/Texture menu on the right.
Choose from the Materials catalog of woods, fabrics, metals, and paints to see the change applied in real-time.
Move & Rotate Objects #
In 3D Mode it’s easy to reposition furniture.
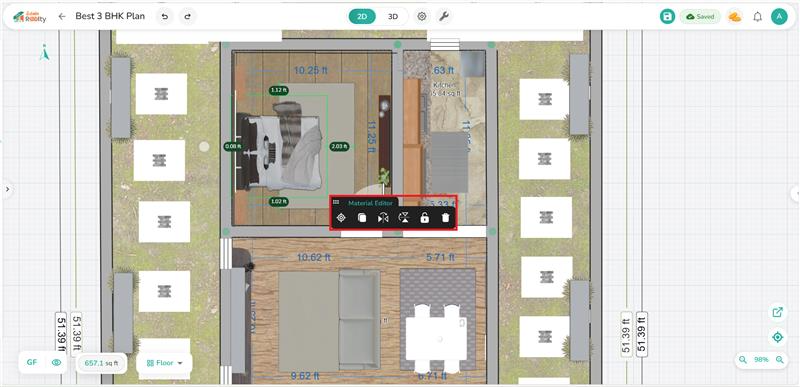
Tap twice on the furniture to edit it.
Use the guide arrows in snap mode to move a piece across the room or to turn it around.
Click again to lock it in place.
Viewing a Room in 3D 360° Walkthrough & Panorama #
Two powerful immersive features in 3D Viewing are the Walkthrough and Panorama.
ℹ️ 360° Walkthrough: An Interactive Virtual Tour #
You can move from one point to another inside a property
Each point shows a 360-degree view
You navigate like walking through a real building (walk straight, turn around, or look out of a window).
You can click the onscreen arrows or hotspots (on doors) to go to the next room.
ℹ️ 360° Panorama: Step into the Full Picture #
A single 360-degree room image taken from one fixed position only
You can rotate and look around the room.
You cannot move to another room.
Zlendo Realty Interactive 3D Viewer Features Explained #
| Feature | 360° Panorama (The “Look Around”) | 360° Walkthrough (The “Explore”) |
| Movement | Static. You are rooted to the floor. | Dynamic. You can “walk” through doors. |
| Perspective | Single point of view. | Multiple connected viewpoints. |
| Navigation | Rotation and zoom only. | Hotspots, floor plans, and arrows. |
| Spatial Awareness | Low; hard to tell where rooms are. | High; clear understanding of layout. |
| Best For | Showing a view or a small studio. | Real estate, hotels, and large venues. |
Using the 360° Walkthrough/Panorama Mode #
Walk through every room of a plan once you have completed the furnishing and decor.
Or view every detail in one room in full Panoramic viewing experience.
To get started, click on the 360° icon (man) and choose the 360° Walkthrough/Panorama Mode.
360° Walkthrough/Panorama Settings #
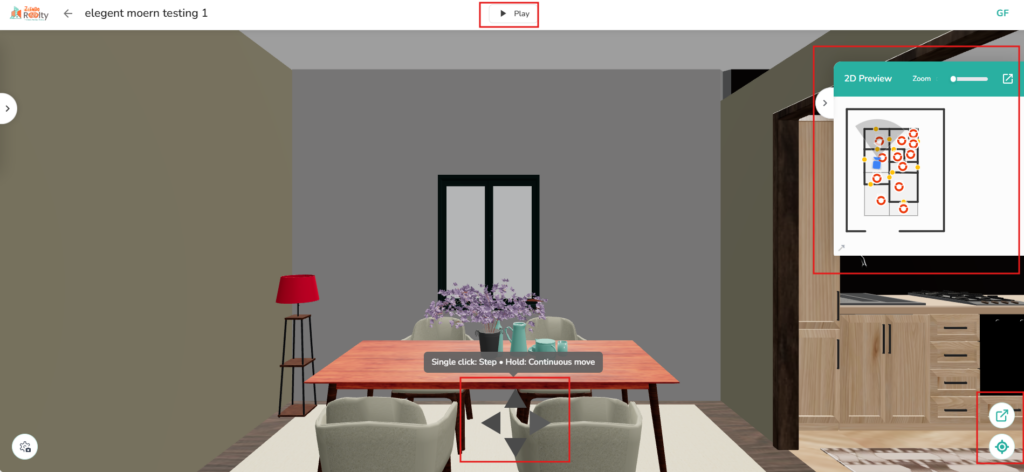
The Panorama Viewer provides an immersive, first-person perspective of your architectural design.
Panorama mode allows you view every detail in one room to evaluate lighting, scale, and layout flow.
Panorama Settings and Controls #
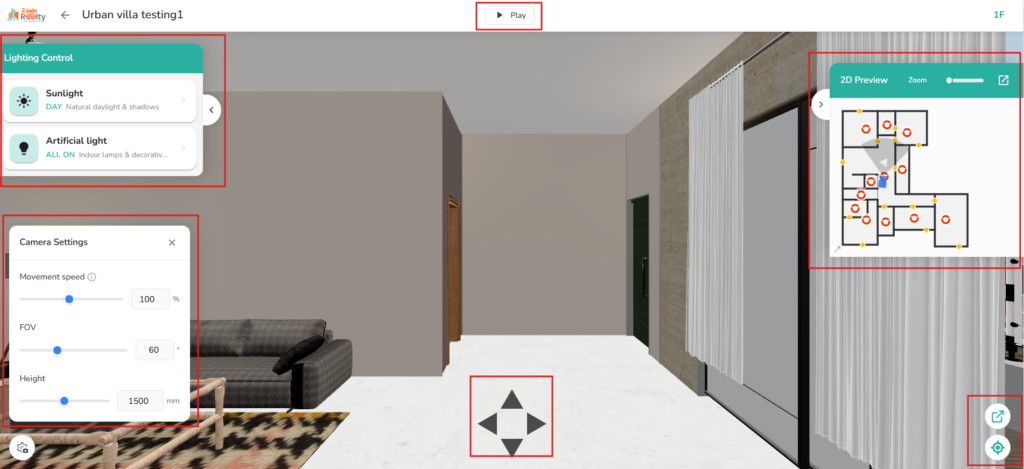
Panorama Mode has four setting controls.
1. Environmental Lighting Control: Located in the top-left corner, this panel allows you to toggle the atmosphere of the room instantly.
– Sunlight: Activates natural daylight. This is essential for checking how shadows fall across a room and how natural light interacts with different textures.
– Artificial Light: Toggles all indoor lamps and decorative fixtures. Use this to test the placement of light sources and ensure every corner of the property is well-lit.
2. Camera Settings
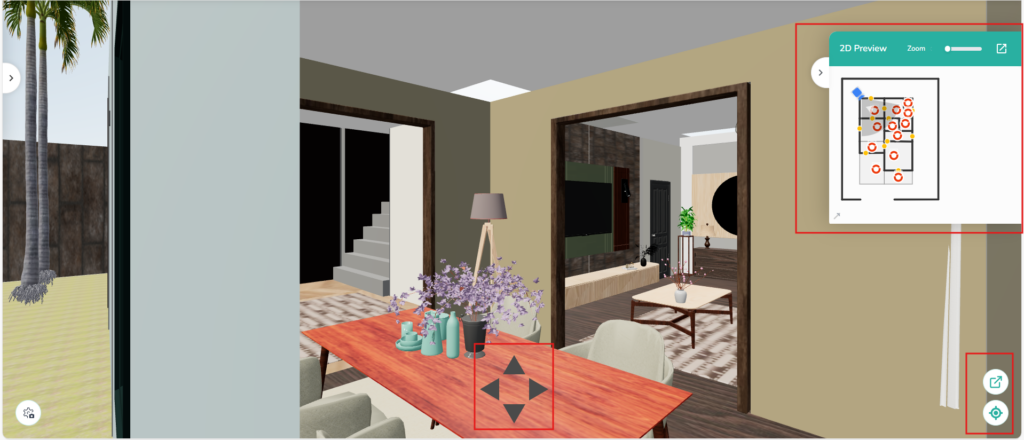
3. 2D Preview (Mini-Map): showing the camera position and FOV in each room.
– Location Indicator: The blue icon shows your current position and the direction the camera is facing.
– Navigation Dots: Red circles indicate “Teleport Points,” allowing you to jump quickly between rooms.
– Zoom Slider: Adjust the scale of the mini-map for a broader view of the floor or a detailed look at the immediate surroundings.
4. Navigation & Interface Controls
– Play/Pause button to start viewing the room in 360° path
– Navigation arrows for step-by-step movement control
– View Options (Bottom Right): * Expand Icon: Pops the viewer out into a separate window or full screen mode.
– Recenter Icon: Instantly resets the camera to a leveled, forward-facing position.
Adjusting the Video Camera Settings #
To change the Camera settings, click on the Camera settings icon on the bottom-left of the 3D Walkthrough screen.
On the 360° Walkthrough/Panorama Camera Settings panel, you can adjust:
1. Camera Movement speed: Adjusts how fast you move through the space when using navigation arrows.
2. FOV: Adjust the camera’s Field of View. FOV Changes the “camera lens” angle.
– A higher FOV (e.g., 90°) provides a wider, more cinematic view
– A lower FOV (e.g., 60°) is more realistic to human sight
3. Height: Sets the eye-level of the camera (in mm).
– Standard eye level is typically between 1500mm and 1700mm.
⚠️ Pro Tip: When presenting to clients, set the Height to 1600mm and FOV to 75° for the most natural, inviting perspective of the interior.
Adjusting Sunlight & Artificial Lighting #
In the 360° Walkthrough/Panorama view, on the top-left of the screen you have the Lighting Control panel.
Adjusting Sunlight Settings #
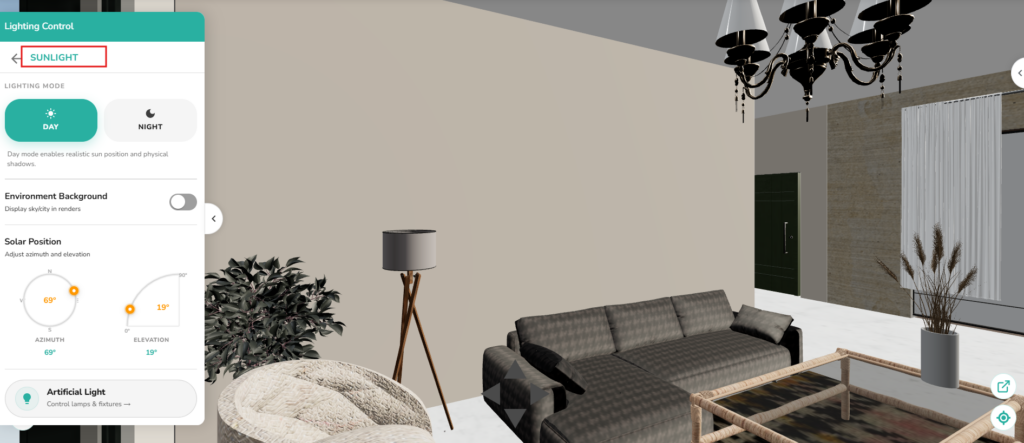
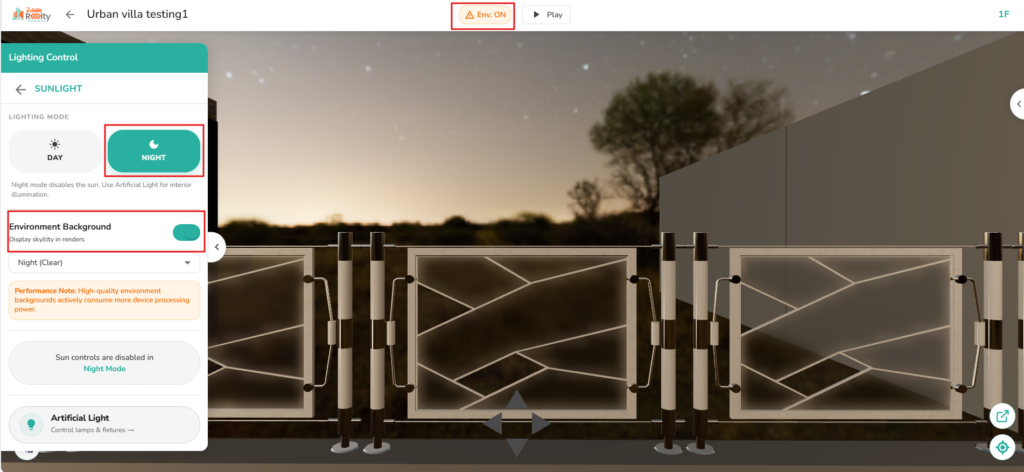
The Sunlight menu allows you to control the time of day, atmosphere, and the exact position of the sun to create realistic lighting and shadows in your project.
360-degree Walkthrough/Panorama mode –> Lighting Control –> Sunlight
1. Select Lighting Mode: Choose between two primary presets to set the base atmosphere:
Day: Enables realistic sun positioning and physical shadows.
Night: Silences natural light to focus on indoor and decorative lighting.
2. Customize Environment Background: This feature determines what is visible through windows and in the distance.
Toggle Switch: Use the green toggle to display or hide the sky/city in your renders.
Dropdown Menu: Select a specific atmosphere (e.g., City Afternoon).
⚠️ Performance Note: Keep in mind that high-quality backgrounds consume more processing power; if the app feels laggy, consider turning this off while editing.
3. Adjust Solar Position: For precise control over how light enters a room, use the two circular dials:
Azimuth: Rotates the sun 360° around your property. This changes which windows the light shines through.
Elevation: Moves the sun up or down (0° to 90°). This adjusts shadow length (e.g., 90° is high noon; 10° is sunset).
Adjusting Artificial Light Settings #
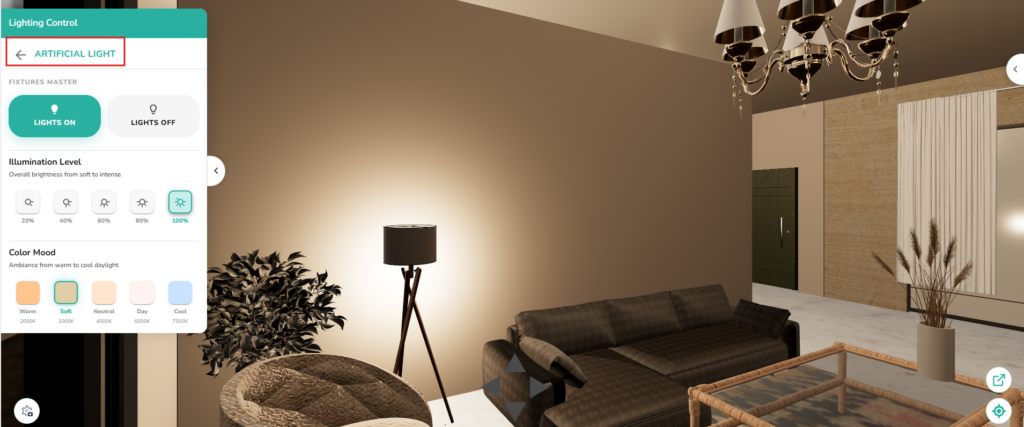
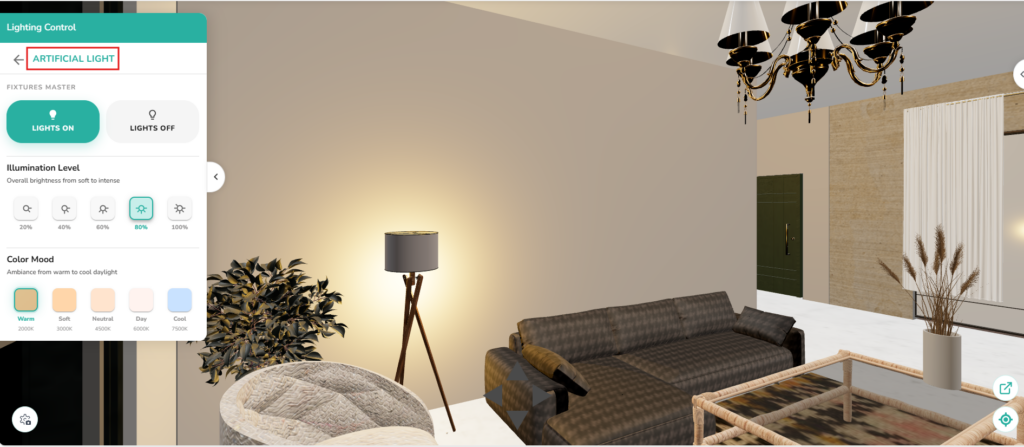
Artificial Light settings allow you to manage the individual lamps, chandeliers, and decorative fixtures within your project to create the perfect interior ambiance.
On the Lighting Control Panel –> Artificial Light
1. Accessing the Menu
To manage your fixtures, scroll to the bottom of the Lighting Control panel and click on the Artificial Light button (indicated by the lightbulb icon).
2. Available Options
Once inside the Artificial Light menu, you can typically perform the following actions:
Master Toggle: Turn all indoor lights on or off simultaneously.
Intensity Slider: Dim or brighten lights to match the mood of the room.
💡 Pro-Tip: Night Mode Visualization
For the best results when adjusting artificial lights, switch the Lighting Mode at the top of the panel to Night. This removes the sun’s influence, allowing you to see exactly how your fixtures illuminate the space.
⚠️ Performance Note
Having a large number of active light sources with complex shadows may impact the smoothness of the 3D walkthrough on some devices. If navigation feels slow, try turning off non-essential decorative lights.
Navigation On Screen #
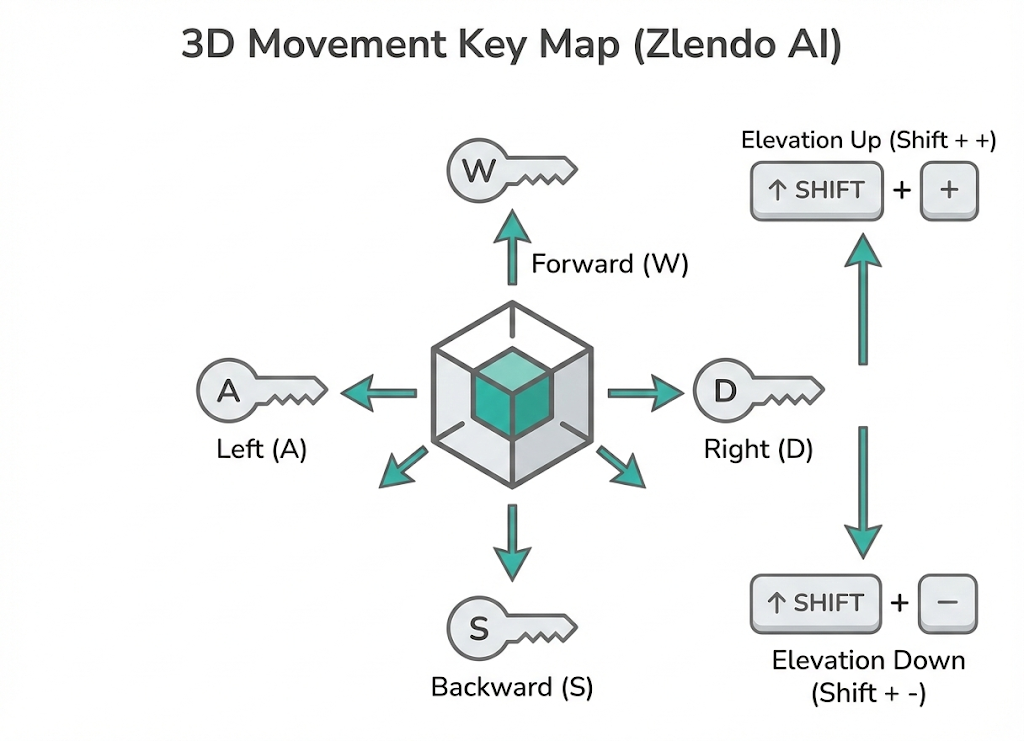
Moving through your design in 3D should feel natural. Use the following controls listed below to experience your plan in real-world settings.
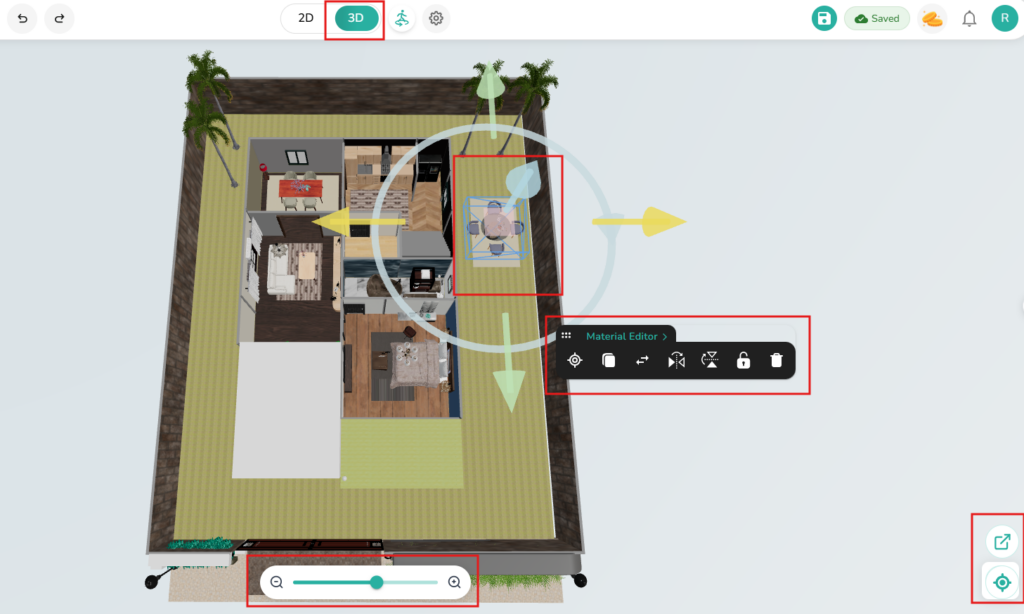
In Normal 3D Mode #
Center View: To view the 3D floor plan from the to click on the Center View (target icon) at the bottom-right of the Workspace.
Zoom: Use the Zoom slider at the bottom of the screen or the mouse scroll wheel (or pinch-to-zoom) to get a closer look at textures or pull back for a bird’s-eye view.
Selection: Click on any object to highlight it.
Positioning: Click and drag the object to move it across the floor.
Rotation: Use the circular arrow handle that appears above or below a selected object to spin it to the desired angle.
In 360° Walkthrough/Panorama Mode #
On the Walkthrough Screen you have the 2D Preview box on the right. The red circles in the 2D Preview shows the camera position and FOV in each room.
Use the 2D Preview panel to:
Change the room shown on the screen: Click on a red Camera circle in another room.
Center the camera in a room: Click on the red Camera circle of the room.
Navigating Inside a Room in Walkthrough/Panorama #
Play/Pause button to start viewing the room in 360° path
Up/Down/Right/left for step-by-step movement control: Use the joystick control arrows inside a room.
To leave a room and enter the next one: Click on a door or use the 2D Preview red circle.
Orbit/Rotate: Click and drag the mouse hand (or use one finger on touchscreens) to rotate the camera around a central point.
Pan: Right-click and drag (or use two fingers) to move the camera sideways or up and down.