Zlendo Realty Logo

AI Floor Planner

Design & Visualize in 3D

2D to 3D Converter

Instant floor plan conversion

Smart Room Styler

AI-driven interior styling

Interiors & Exteriors

Region-aware design intelligence

Smart Cost Estimator

Precise project budgeting

Vastu Optimizer

Ancient wisdom, modern tech

Realistic Renders

Photorealistic lighting visualization

Virtual Walkthrough

8K Ultra-realistic experiences

Floor Plan Design

Professional floor planning

2D to 3D Conversion

Transform your plans to 3D

Interior Design Services

Professional interior planning

Vastu Consultation

Expert Vastu guidance

Virtual Walkthrough Services

Immersive 3D experiences

Design Library

Inspiration gallery

Tutorials

Learn the platform

Help Center

Find answers & support

Blog

Insights & Updates

News

Industry Trends & Updates

Plans

Business Free Trial

Try enterprise features

Affiliate & Partner Program

Grow with Zlendo

Zlendo Realty API Suite

Grow your Business with Us

Business
Login Start For Free

Menu

AI Floor Planner 2D to 3D Converter Smart Room Styler Interiors & Exteriors Smart Cost Estimator Vastu Optimizer Realistic Renders Virtual Walkthrough
Floor Plan Design 2D to 3D Conversion Interior Design Services Vastu Consultation Virtual Walkthrough
Design Library Tutorials Help Center Blog News
Plans
Business Free Trial Affiliate & Partner Program Zlendo Realty API Suite
For Individuals For Business
Login Start For Free

General

4
  • About Zlendo Realty 
  • How to Use the Zlendo Realty Help Center Documents
  • Zlendo Realty FAQ
  • Navigation Tools & Keyboard Shortcuts Cheat Sheet

Getting Started

2
  • Sign Up: Creating a Zlendo Realty Account 
  • Signing In 

Account

2
  • Sign Up: Creating a Zlendo Realty Account 
  • Payment & Billing

Account Setup

1
  • Sign Up: Creating a Zlendo Realty Account 

Dashboard

5
  • Zlendo Realty Dashboard: First-Time User Tour 
  • Creating New Projects
  • Find & Manage Projects
  • Zlendo Realty Community: Creating Project Templates & Sharing Designs
  • Payment & Billing

Zlendo Realty Editor

8
  • Editor Tour: Introducing the Project Workspace
  • Navigation Tools & Keyboard Shortcuts Cheat Sheet
  • 2D Floor Planner: Drawing or Editing in the Zlendo Realty Workspace
  • 3D Visualization, 360° Walkthrough & Panorama
  • Zlendo Realty Render Tool
  • Zlendo Realty AI Inspiration Tools
  • Zlendo Realty Cost Estimation Tool
  • Export Plan & Floorplan Generator Tool

Projects

10
  • 2D Floor Planner: Drawing or Editing in the Zlendo Realty Workspace
  • Creating New Projects
  • Find & Manage Projects
  • Editor Tour: Introducing the Project Workspace
  • 3D Visualization, 360° Walkthrough & Panorama
  • Navigation Tools & Keyboard Shortcuts Cheat Sheet
  • Zlendo Realty AI Inspiration Tools
  • Furniture & Decor
  • Zlendo Realty Cost Estimation Tool
  • Export Plan & Floorplan Generator Tool

2D Drawing & Editing

6
  • 2D Floor Planner: Drawing or Editing in the Zlendo Realty Workspace
  • Editor Tour: Introducing the Project Workspace
  • Navigation Tools & Keyboard Shortcuts Cheat Sheet
  • Zlendo Realty Render Tool
  • Zlendo Realty Cost Estimation Tool
  • Export Plan & Floorplan Generator Tool

Interior Design

5
  • Furniture & Decor
  • Zlendo Realty AI Inspiration Tools
  • Editor Tour: Introducing the Project Workspace
  • 2D Floor Planner: Drawing or Editing in the Zlendo Realty Workspace
  • 3D Visualization, 360° Walkthrough & Panorama

3D Editing & Viewing

6
  • 3D Visualization, 360° Walkthrough & Panorama
  • Navigation Tools & Keyboard Shortcuts Cheat Sheet
  • Editor Tour: Introducing the Project Workspace
  • Zlendo Realty Cost Estimation Tool
  • Zlendo Realty Render Tool
  • Export Plan & Floorplan Generator Tool

AI Inspiration

2
  • Zlendo Realty AI Inspiration Tools
  • Editor Tour: Introducing the Project Workspace

Cost Estimation

2
  • Zlendo Realty Cost Estimation Tool
  • Editor Tour: Introducing the Project Workspace

Vastu

1
  • Zlendo Realty Vastu Tool

Render

2
  • Zlendo Realty Render Tool
  • Editor Tour: Introducing the Project Workspace

Real-World Preview

1
  • 3D Visualization, 360° Walkthrough & Panorama

Export Plan

1
  • Export Plan & Floorplan Generator Tool

Signing In

1
  • Signing In 

Password Change

1
  • Resetting Your Password 

Project Workspace Settings

1
  • Editor Tour: Introducing the Project Workspace

Project Workspace

9
  • Editor Tour: Introducing the Project Workspace
  • Navigation Tools & Keyboard Shortcuts Cheat Sheet
  • 2D Floor Planner: Drawing or Editing in the Zlendo Realty Workspace
  • 3D Visualization, 360° Walkthrough & Panorama
  • Zlendo Realty AI Inspiration Tools
  • Zlendo Realty Cost Estimation Tool
  • Zlendo Realty Render Tool
  • Zlendo Realty Vastu Tool
  • Export Plan & Floorplan Generator Tool

FAQ

1
  • Zlendo Realty FAQ

Workspace Navigation

2
  • Navigation Tools & Keyboard Shortcuts Cheat Sheet
  • 3D Visualization, 360° Walkthrough & Panorama

360° Walkthrough & Panorama

2
  • 3D Visualization, 360° Walkthrough & Panorama
  • Navigation Tools & Keyboard Shortcuts Cheat Sheet

Creating New Projects

1
  • Creating New Projects

Find Projects

1
  • Find & Manage Projects

Manage Projects

2
  • Find & Manage Projects
  • Export Plan & Floorplan Generator Tool

Payment & Billing

1
  • Payment & Billing

Create Templates

2
  • Export Plan & Floorplan Generator Tool
  • Zlendo Realty Community: Creating Project Templates & Sharing Designs

Community

2
  • Export Plan & Floorplan Generator Tool
  • Zlendo Realty Community: Creating Project Templates & Sharing Designs

Share Designs

2
  • Export Plan & Floorplan Generator Tool
  • Zlendo Realty Community: Creating Project Templates & Sharing Designs

Version 2.0: Zlendo Realty Editor

5
  • 2.0 Editor: Workspace Tool Updates
  • 2.0 Editor: 2D Draw Mode
  • 2.0 Editor: 2D Edit/Modify Asset Properties
  • 2.0 Editor: 2D Presentation Mode
  • 2.0 Editor: 3D Edit Mode
View Categories
  • Home
  • Docs
  • Zlendo Realty Editor
  • 2D Drawing & Editing
  • 2D Floor Planner: Drawing or Editing in the Zlendo Realty Workspace

2D Floor Planner: Drawing or Editing in the Zlendo Realty Workspace

6 min read

Before you start using the Zlendo Realty Workspace, take a Workspace Tour.

Click on the Guide Icon on the bottom-left of the Workspace for a quick tour and orientation tutorial.
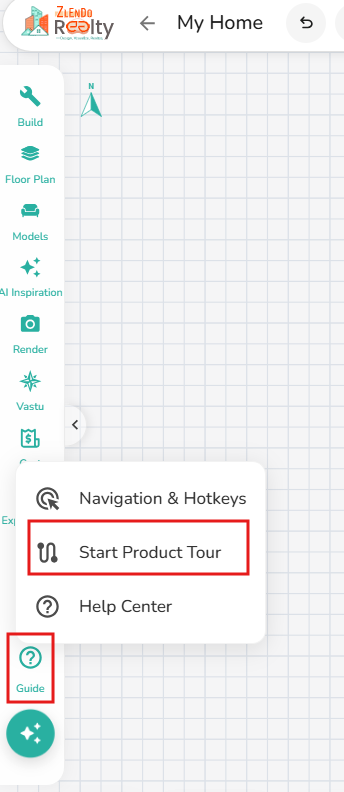
tour of the product editor

Drawing Walls #

Transforming a large, open floor plan into purposeful, functional zones can completely redefine a home’s interior.

From the Dashboard –> Your Projects –> [The Project] you wish to edit or Create a New Project from Scratch.

In the 2D Floor Planner Workspace, navigate to the Build Tools menu on the left side of the interface

– Click to select the Wall option

– Click and drag the line across the workspace to your desired endpoint.

Finalize the Placement: Once your wall line is perfectly positioned, double-click again at the endpoint to lock it in.
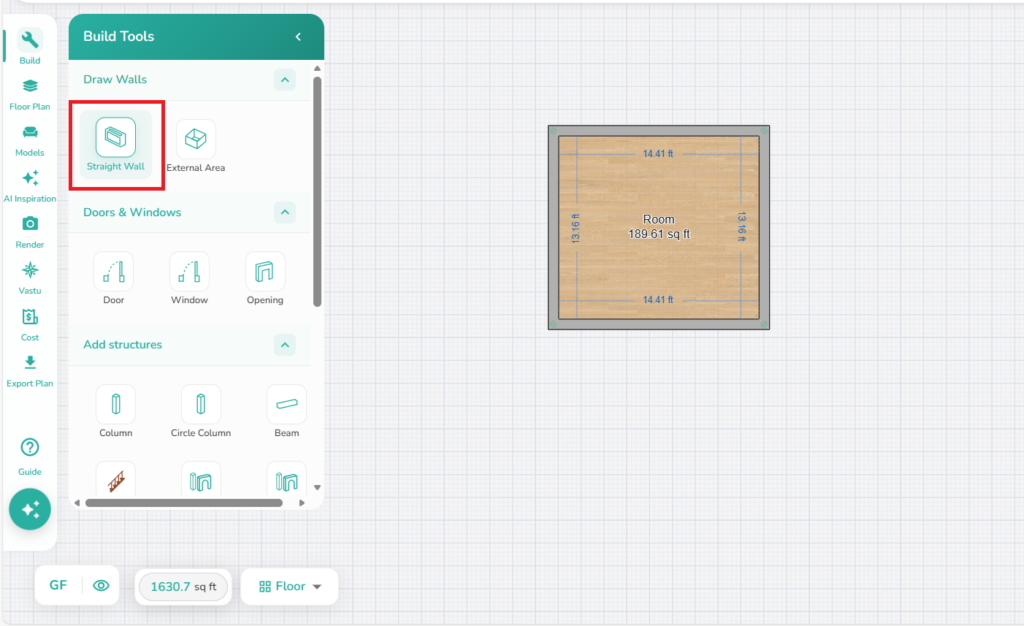
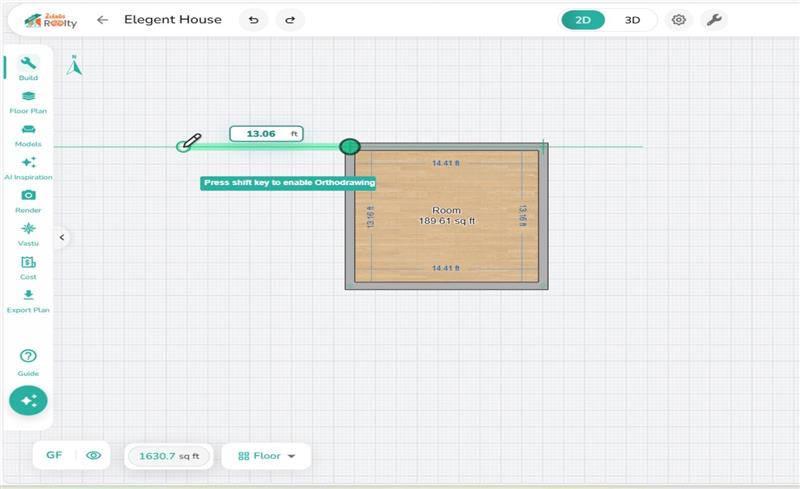
drawing straight walls in 2 D
Selecting straight walls rom build tools

Changing Wall Color or Texture #

Styling: Select the wall to change its color, texture, or thickness to match your design aesthetic.

Additions: Remember that features like doors or windows must be added directly to the room walls.

💡 Design Tip:

Use partitions in Zlendo Realty to visualize “flex spaces,” such as a home office or a reading nook, to show potential buyers the true versatility of a property.

Editing Wall Length & Thickness  #

Whether you are looking to create thin decorative partitions or thick, sturdy exterior walls, Zlendo Realty gives you full control over your structural dimensions.

Adjusting Wall Dimensions for an Entire Room #

To change the thickness/length of every wall in a specific room simultaneously:
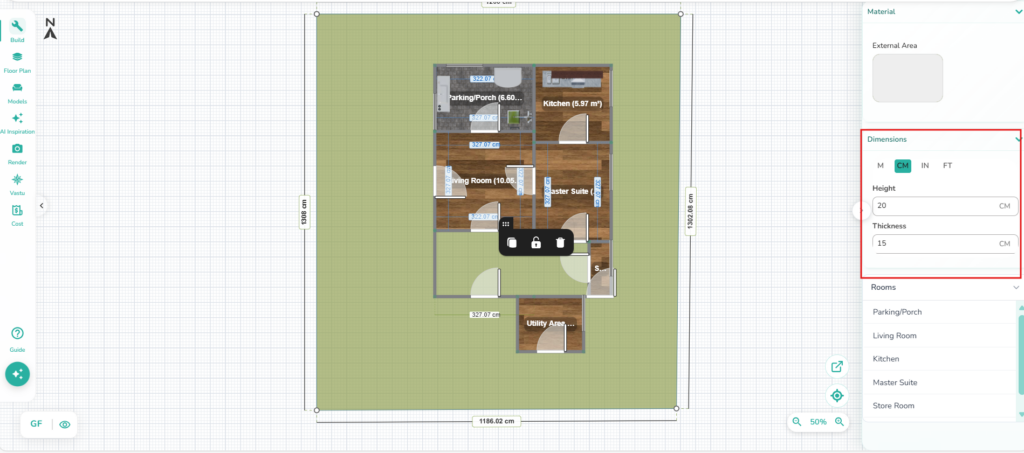
Click inside a Room to Select the Room wall you wish to modify.

Locate the thickness/length input field in the Dimension box at the right of your screen.

Enter the correct wall dimensions.

All walls within that room will update automatically.
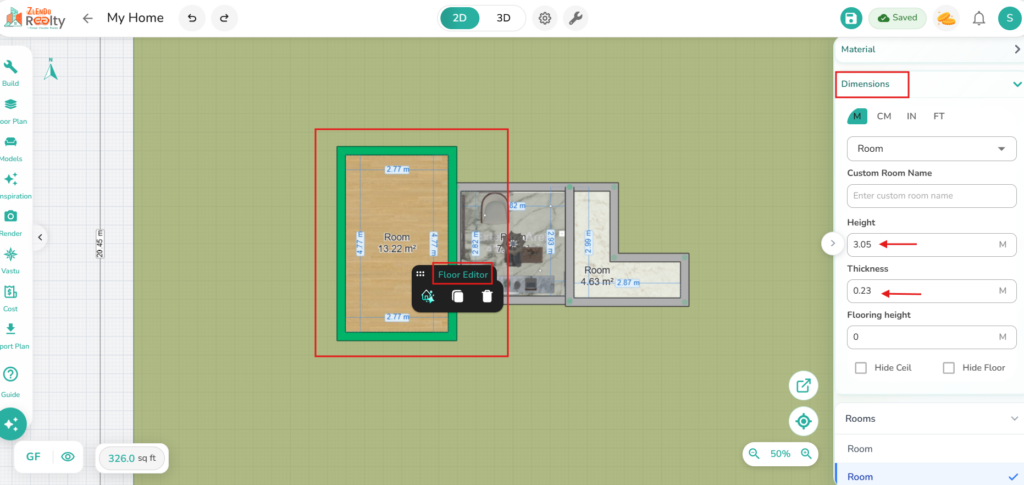
change floor texture and colour
Select the Room and edit its wall dimensions

Adjusting a Single Wall #

Change Wall dimensions/materials:

Click on the Wall you want to edit to select it.

Navigate to the thickness/length input field in the Dimension box at the right of your screen.

Enter the new value to adjust that wall independently of the rest of the room.

Change an Interior Wall Model/Style:

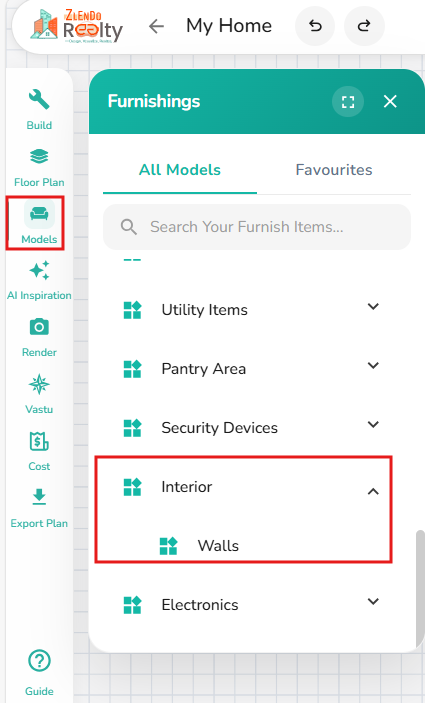
Navigate to Models on the Side Tool bar –> Models –> Interior –> Walls

Select wall Style/Model

Click on the Material Editor tool to fine tune the new Wall’s materials.
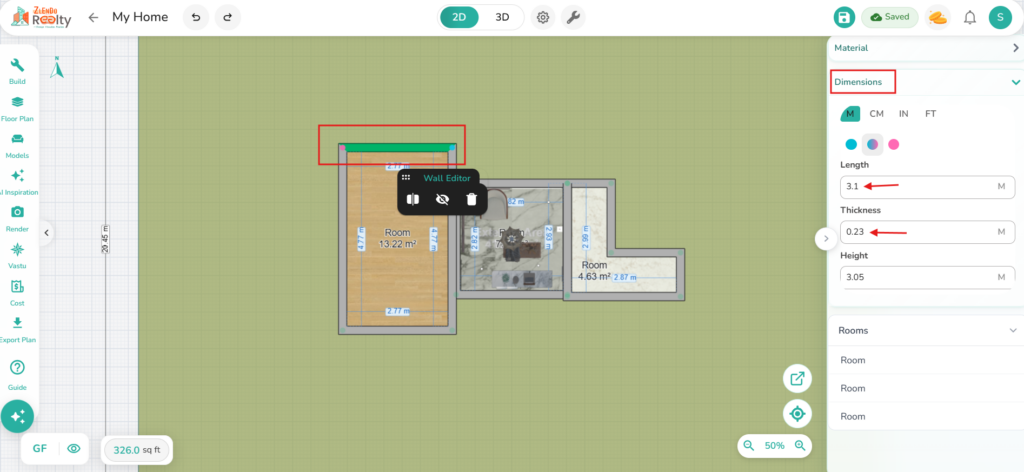
adjusting dimensions of the selective walls
Select the Wall and change dimensions
editing the interior wall
Change the interior wall’s model/style

Creating Rooms  #

There are two ways to add a new room to your plan:
Build –> Draw a Wall
Build –> Rooms –> Room Shapes

1. Adding a Room of a Predefined Form: To streamline your design process, Zlendo Realty offers several predefined room shapes and flexible drawing tools.

– Square Room: A quick start for standard bedrooms or utility spaces.

– Rectangular Room: Ideal for living areas and hallways.

– L-shaped Room: Perfect for complex architectures or “L-shaped” open-concept zones.

2. Use the Wall Drawing Tool (draw walls): Best for unique layouts or custom-angled spaces.

💡 Zlendo Realty Tip:

Create separate rooms and position them next to each other.

Define each room individually rather than starting with a large space and dividing it later. This approach keeps the layout well-structured and helps maintain better organization during the design process.
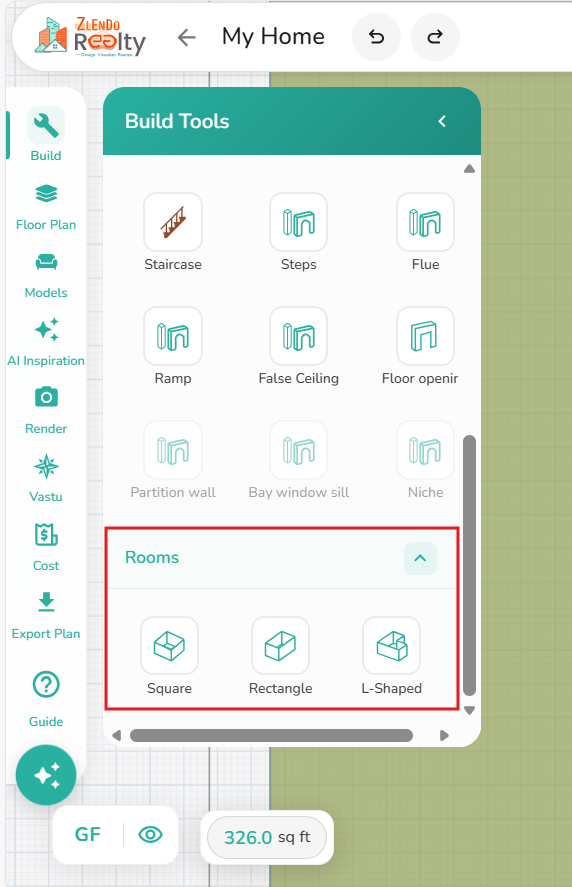
different shape of the rooms
Room Shapes

How to Place Your Room #

To Add a Room from Predefined Forms:
Build –> Rooms

Select your preferred Room shape from the Build Icon library.

The room will be added into your plan.

📌 Note:
When you add a second room, and you want to move it click inside the room to select it and drag to move it.

Naming Rooms #

When you add a room remember to label it.

Select the room you wish to label.

Enter the Room Name in the Room Name editor box at the right of your screen.

– Click on the dropdown arrow to pick from a list.

– Or add your Custom Room Name.
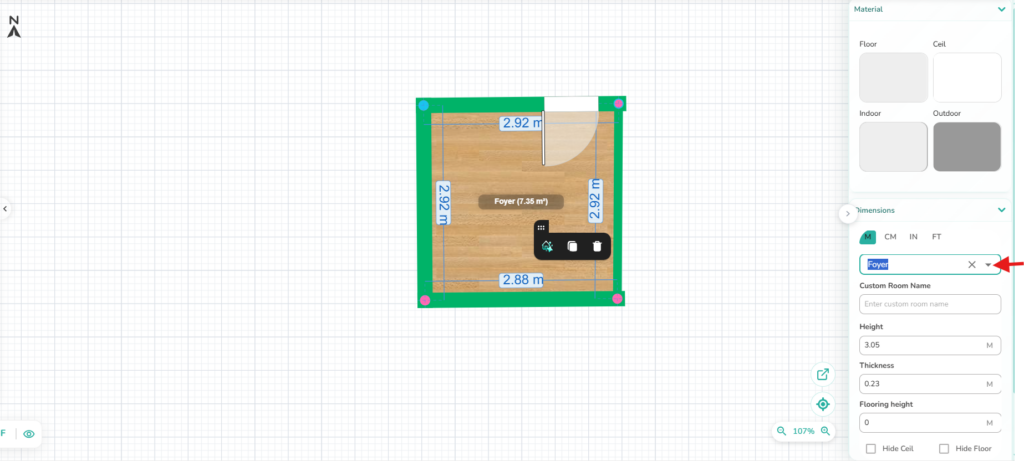
naming the rooms
Name a Room

Adding Doors  #

To add a door to a room:

Build –> Doors & Window –> Door

OR to select a particular Door Style/Model

Models –> Doors –> Select a door model

Click on the ‘Build’ icon on the left.

From the Doors & Windows section choose Door.

Click on the room wall where you want to place the door. You can drag it to adjust its position.

– Additionally, click on the door to select it and enter exact door dimensions in the box on the right to adjust the door size.

– Choose the Door materials from the Materials options from the box on the right.

You can also select and add doors from Models → Doors to place predefined door models in other styles.
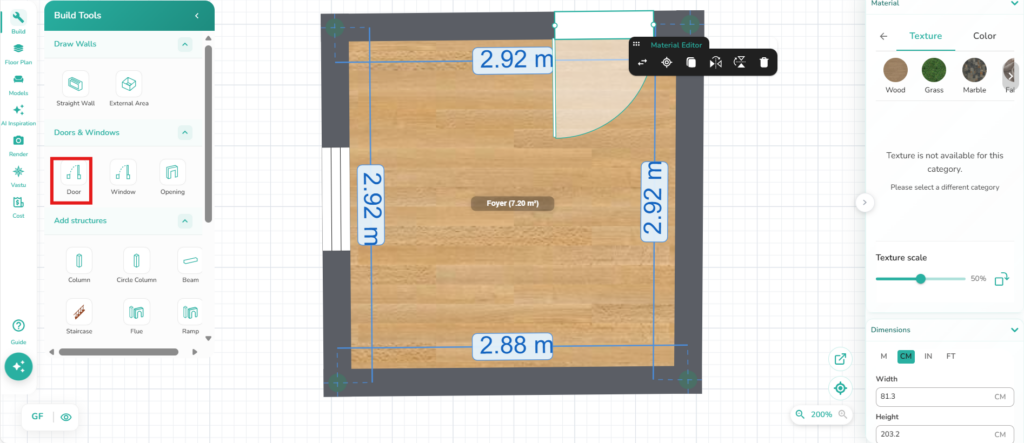
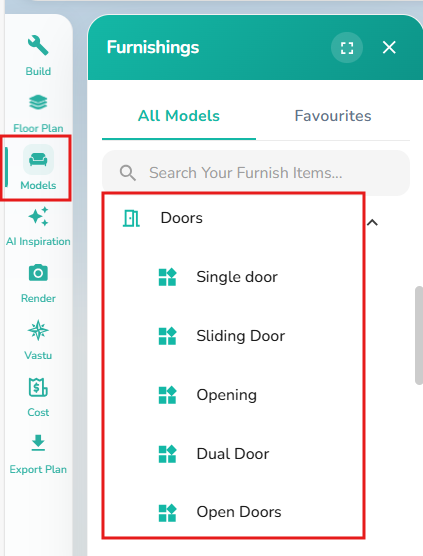
placing the doors for the rooms in 3 D
Build Tool: Add a Door
types of doors in models
Select a door from available styles

Adding Windows  #

To Add a Window to a Room:

Build –> Doors & Windows –> Window

OR

To change window styles:

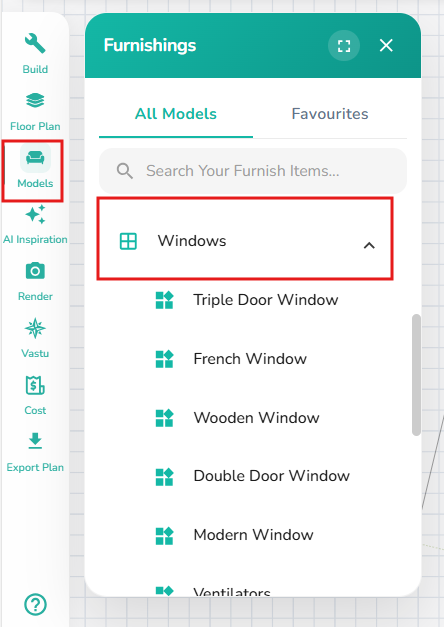
Models –> Interior –> Windows

Click on the ‘Build’ icon on the left.

Click on the Window option to select it.

Click on the external wall where you want to place the window. You can drag it to adjust its position or dimensions.

– Additionally, click on the window to select it and enter exact window dimensions in the box on the right to adjust the window size.

– Choose the window materials from the Materials options in the box on the right.

You can also select and add windows from Models → Windows to place predefined models in other styles.
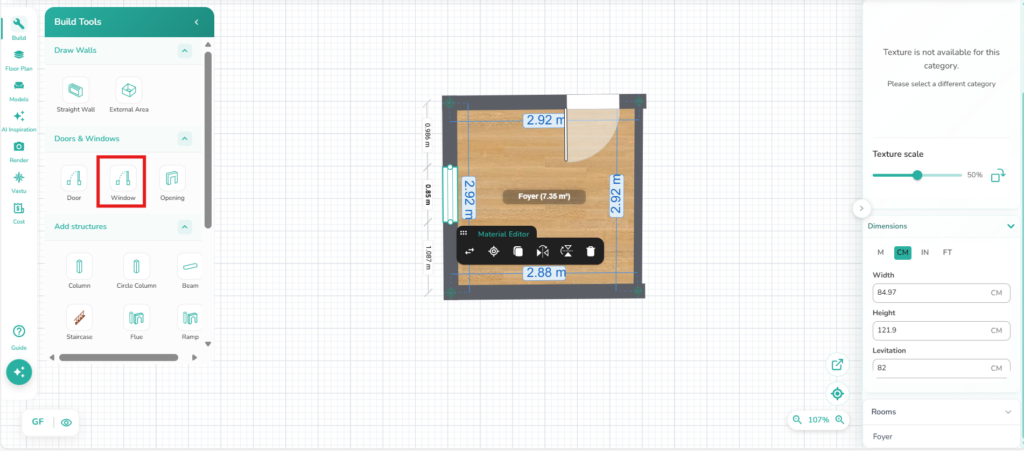
placing windows in  2D
Build Tool: Add Window
types of windows in models
Select Window by Model/Style

Change Room Materials/Dimensions #

Once placed, you can easily drag the walls to match your exact dimensions or edit the room dimensions from the editor box on the right.

To Edit Room Materials:
Select the Room / Wall / Floor you want to edit

Click on the object you wish to edit.

– E.g., to change the flooring material, you can use the Editor box on the right side or the mobile Material Editor icon.

Verify all changes in 3D mode.
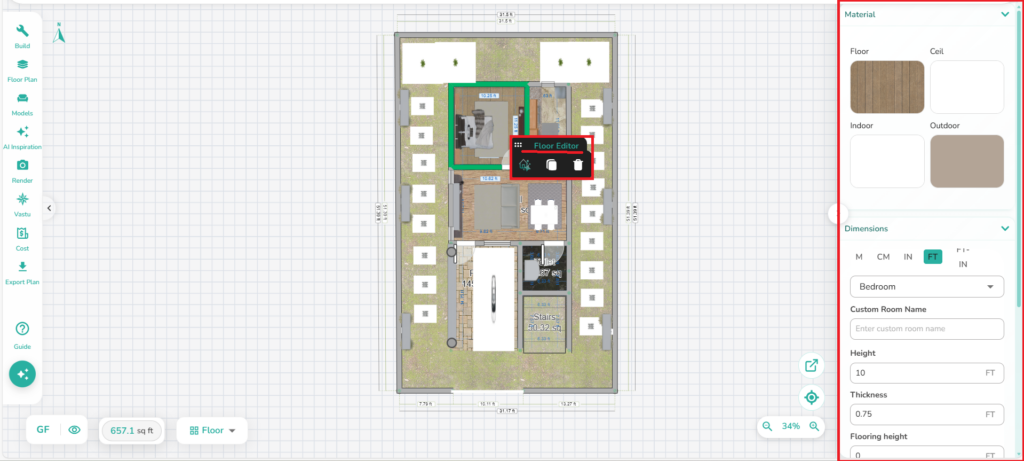
floor editor of the room
Room Material Editor

Adding More Floors  #

To add a new upper or lower floor:
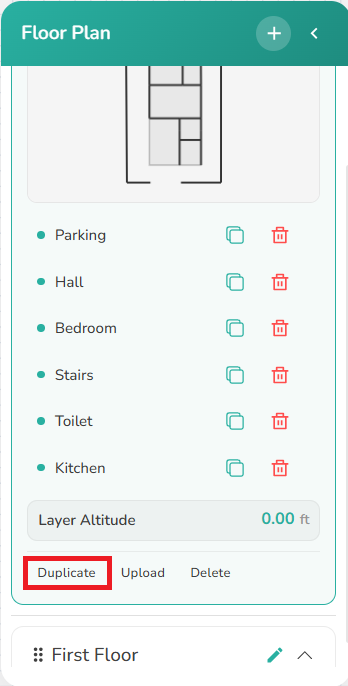
Floor Plan –> Duplicate floor / Add / Edit / Rename Floor.

You can duplicate the Ground Floor (GF), rename it and add, delete or keep the existing rooms.

💡Floor Building Tips:

Name Floors

If you are designing a complex building, rename your floors immediately (e.g., “Ground Floor,” “First Floor,” “Terrace”). This makes it easier to navigate the design when using the AI Room Stylist to apply different themes to different levels.

Plan for Stairs Early

Make sure to create a floor opening where the stairs will be placed.

– Place your staircase on the ground floor first.

– Once you add the second floor, use the “Floor opening” structure from the Build tool to create the corresponding hole in the upper floor’s surface so the stairs are visible in 3D mode.

Verify in 3D frequently

Switch from the 2D Planner to 3D View every time you add a level. This helps you spot “floating” walls or misaligned balconies that might not be obvious in the flat 2D view.
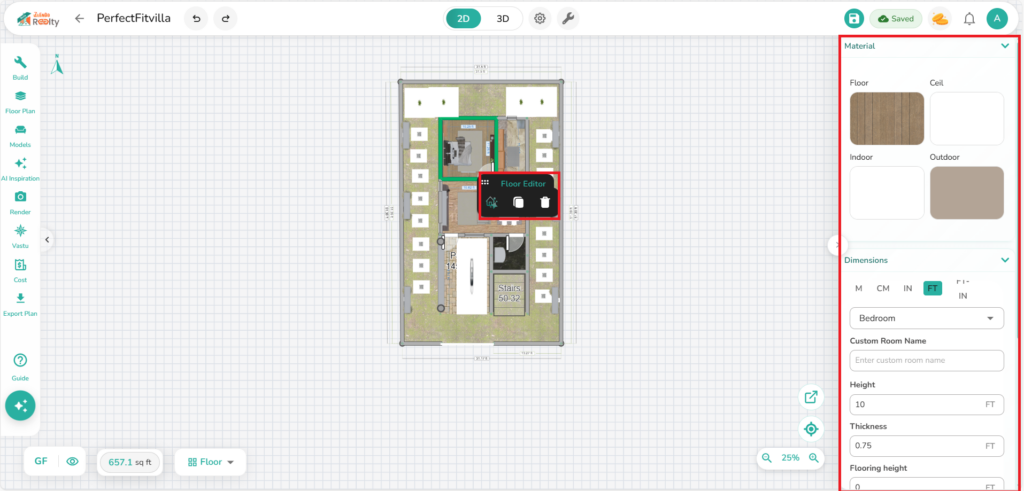
floor editor
Build Tool: Floor Plan
duplication of floor plan
Add/Edit Floors

External Area  #

The area outside the Build-up area is the External Area. You can add Exterior and Garden elements like plants, pools, lighting within this area.

When you Start a Project from Scratch the Site Area you enter in the Create a New Project form will be the plan’s External Area in the 2D Workspace.
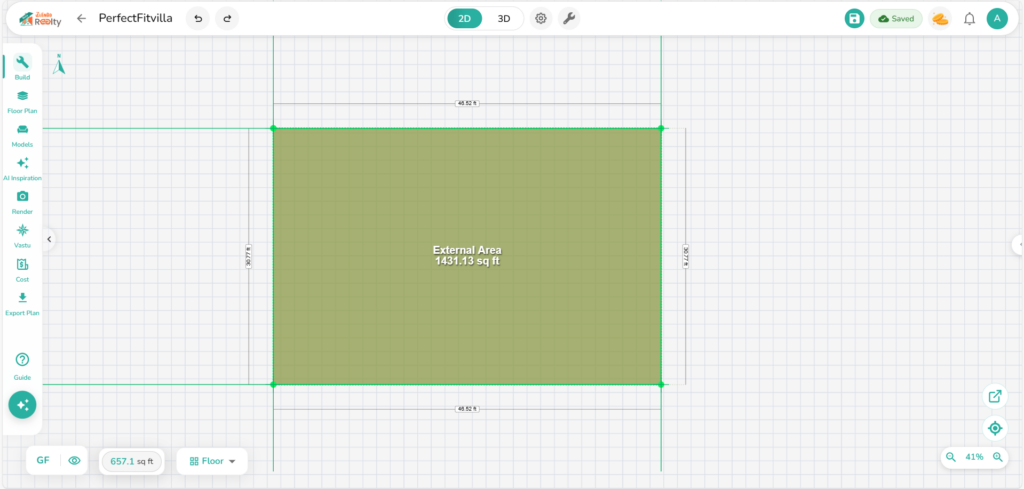
external area of the floor plan
External Area

Drawing or Adding the External Area #

If you uploaded a floor plan, you may need to add/edit the External area manually.

Build –> Draw Walls –> External Area

Click and drag the editor pencil line from corner to corner. Double-click to finish.

– Exact dimensions can be adjusted from the Dimensions box on the left.
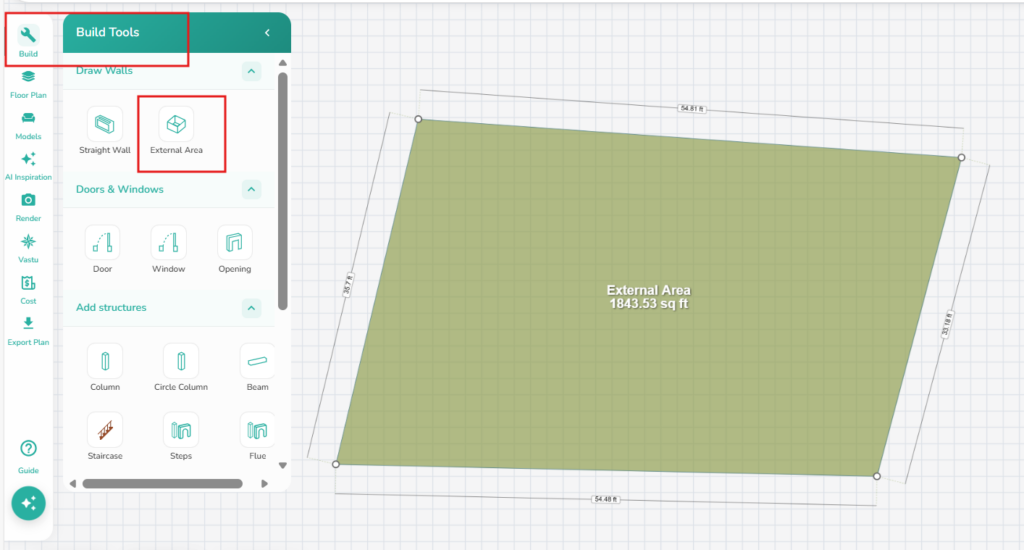
drawing external plot area
Draw External Plot Area
editing the dimensions of external area
Change/Edit External Area dimensions

Adding Outdoor Elements  #

Outdoor elements include Outdoor furniture or external building items, like Roofing, Walkways, Swimming Pools, Lawns, and Plants.

To add an Outdoor element/item to the External Area (area outside the Indoor plan area):
Model –> Outdoor / Exterior

Click on an item/object to select it and click inside the External Area where you want to place it.

View the Exterior Area in 3D Mode to make Change Position/Dimension/Texture/Color

In 3D Mode, click on the Material Editor tool to alter dimensions, color and texture of an added element (Trees, plants, pool etc.).

– Use the rotation arrows (visible around the selected 3D object) to turn it clockwise or anticlockwise and the straight arrows to reposition/move it in a desired direction.
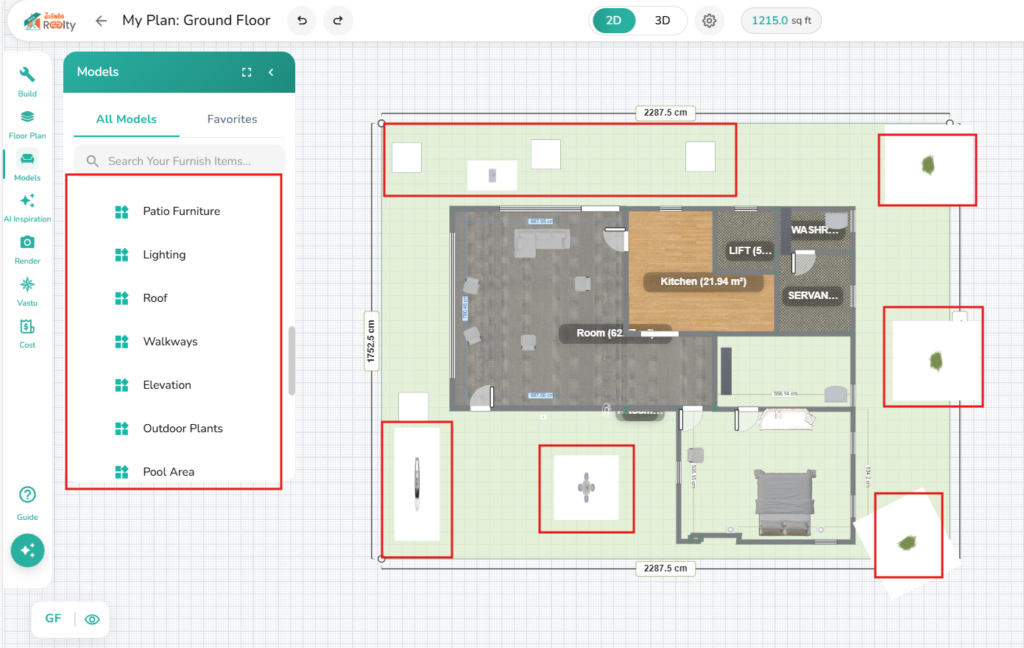
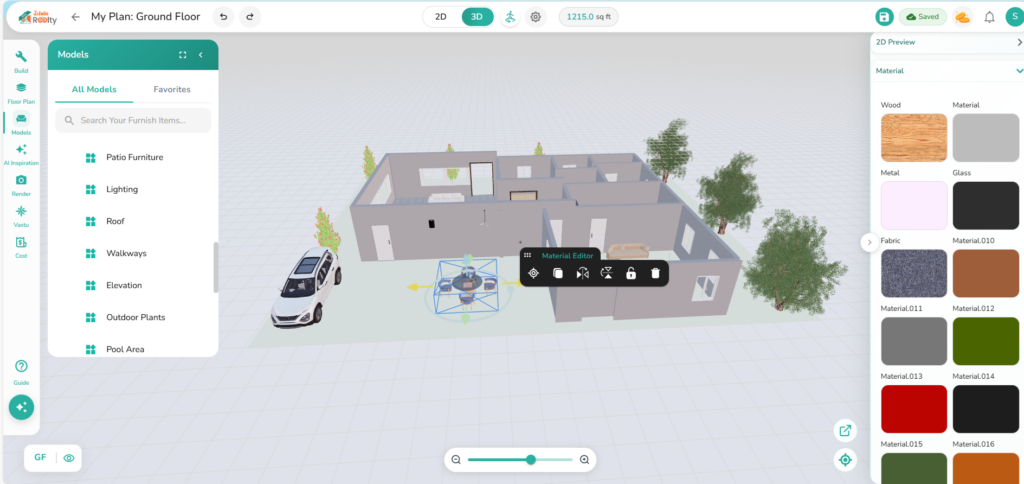
placing outdoor and external elements in external area
Outdoor & Garden Models: 2D View
snapping of the external objects in 3 D
Edit Outdoor/Garden Models in 3D View
Updated on May 7, 2026
2D Floor Plan Editing Creating New Projects Projects

What are your Feelings

  • Happy
  • Normal
  • Sad

Share This Article :

  • Facebook
  • X
  • LinkedIn
  • Pinterest
Export Plan & Floorplan Generator ToolEditor Tour: Introducing the Project Workspace

Powered by BetterDocs

Table of Contents
  • Drawing Walls
    • Changing Wall Color or Texture
    • Editing Wall Length & Thickness 
      • Adjusting Wall Dimensions for an Entire Room
      • Adjusting a Single Wall
  • Creating Rooms 
    • How to Place Your Room
    • Naming Rooms
  • Adding Doors 
  • Adding Windows 
  • Change Room Materials/Dimensions
  • Adding More Floors 
  • External Area 
    • Drawing or Adding the External Area
    • Adding Outdoor Elements 

Create your account today

Experience the future of AI home design for free.

Get Started
Zlendo Realty Logo

The world's first Design-to-Sales engine. Experience your space in 360° ultra-realistic 8K, AR/MR.

EINShield VAPT Secured

VAPT Secured

Products

  • AI Floor Planner
  • 2D to 3D Converter
  • Smart Room Styler
  • Interiors & Exteriors
  • Smart Cost Estimator
  • Vastu Optimizer
  • Realistic Renders
  • Virtual Walkthrough

Services

  • Floor Plan Design
  • 2D to 3D Conversion
  • Interior Design Services
  • Vastu Consultation
    Services
  • Virtual Walkthrough
    Services

Use Cases

  • Home Remodeling
  • Interior Design
  • Vastu Optimization
  • New Home Building
  • Commercial Spaces
  • Builder & Promoter
  • NRI & Remote Planning
  • Developer Solutions
  • Zlendo Realty API Suite

Resources

  • Design Library
  • Pre-built Templates
  • Blog
  • Tutorials
  • Help Center
  • News
  • Grow with Zlendo
  • Contact Us
  • About Us

Legal & Policies

  • General Terms
  • Community Guidelines
  • NDA For Vendors
  • Refund & Cancellation Policy
  • Service Level Agreement

Compare

  • Zlendo vs Foyr Neo
  • Zlendo vs Roomsketcher
  • Zlendo vs Coohom

Copyright © 2026 Zlendo Technologies Pvt. Ltd. | All Rights Reserved.

Cookie PolicyTerms & ConditionsPrivacy Policy
Contact Us