Zlendo Realty Logo

AI Floor Planner

Design & Visualize in 3D

2D to 3D Converter

Instant floor plan conversion

Smart Room Styler

AI-driven interior styling

Interiors & Exteriors

Region-aware design intelligence

Smart Cost Estimator

Precise project budgeting

Vastu Optimizer

Ancient wisdom, modern tech

Realistic Renders

Photorealistic lighting visualization

Virtual Walkthrough

8K Ultra-realistic experiences

See all Products

Explore all our offerings

Floor Plan Design

Professional floor planning

2D to 3D Conversion

Transform your plans to 3D

Interior Design Services

Professional interior planning

Vastu Consultation

Expert Vastu guidance

Virtual Walkthrough Services

Immersive 3D experiences

Design Library

Inspiration gallery

Pre-built Templates

Built-in layouts for homes, rooms,...

Webinars

Live PropTech learning

Webinar Recordings

Watch on-demand sessions

Tutorials

Learn the platform

Help Center

Find answers & support

Blog

Insights & Updates

News

Industry Trends & Updates

Plans

Business Free Trial

Try enterprise features

Affiliate & Partner Program

Grow with Zlendo

Zlendo Realty API Suite

Grow your Business with Us

Business
Login Start For Free

Menu

AI Floor Planner 2D to 3D Converter Smart Room Styler Interiors & Exteriors Smart Cost Estimator Vastu Optimizer Realistic Renders Virtual Walkthrough See all Products →
Floor Plan Design 2D to 3D Conversion Interior Design Services Vastu Consultation Virtual Walkthrough
Design Library Pre-built Templates Webinars Webinar Recordings Tutorials Help Center Blog News
Plans
Business Free Trial Affiliate & Partner Program Zlendo Realty API Suite
For Individuals For Business
Login Start For Free

General

4
  • About Zlendo Realty 
  • How to Use the Zlendo Realty Help Center Documents
  • Zlendo Realty FAQ
  • Navigation Tools & Keyboard Shortcuts Cheat Sheet

Getting Started

2
  • Sign Up: Creating a Zlendo Realty Account 
  • Signing In 

Signing In

1
  • Signing In 

Password Change

1
  • Resetting Your Password 

Account

2
  • Sign Up: Creating a Zlendo Realty Account 
  • Payment & Billing

Account Setup

1
  • Sign Up: Creating a Zlendo Realty Account 

Dashboard

5
  • Zlendo Realty Dashboard: First-Time User Tour 
  • Creating New Projects
  • Find & Manage Projects
  • Zlendo Realty Community: Creating Project Templates & Sharing Designs
  • Payment & Billing

Version 2.0: Zlendo Realty Editor

10
  • 2.0 Editor: Workspace Tool Updates
  • 2.0 Editor: 2D Draw Mode
  • 2.0 Editor: 2D Edit/Modify Asset Properties
  • 2.0 Editor: 2D Presentation Mode
  • 2.0 Editor: 3D Edit Mode
  • 2.0 Version Rendering
  • 2.0 version AI Inspiration
  • 2.0 Version 2D Export
  • 2.0 Version 3D Elevation Export
  • 2.0 Version MEP and Structural

Zlendo Realty Editor

8
  • Editor Tour: Introducing the Project Workspace
  • Navigation Tools & Keyboard Shortcuts Cheat Sheet
  • 2D Floor Planner: Drawing or Editing in the Zlendo Realty Workspace
  • 3D Visualization, 360° Walkthrough & Panorama
  • Zlendo Realty Render Tool
  • Zlendo Realty AI Inspiration Tools
  • Zlendo Realty Cost Estimation Tool
  • Export Plan & Floorplan Generator Tool

Cost Estimation

2
  • Zlendo Realty Cost Estimation Tool
  • Editor Tour: Introducing the Project Workspace

Payment & Billing

1
  • Payment & Billing

Vastu

1
  • Zlendo Realty Vastu Tool

Render

2
  • Zlendo Realty Render Tool
  • Editor Tour: Introducing the Project Workspace

3D Editing & Viewing

6
  • 3D Visualization, 360° Walkthrough & Panorama
  • Navigation Tools & Keyboard Shortcuts Cheat Sheet
  • Editor Tour: Introducing the Project Workspace
  • Zlendo Realty Cost Estimation Tool
  • Zlendo Realty Render Tool
  • Export Plan & Floorplan Generator Tool

360° Walkthrough & Panorama

2
  • 3D Visualization, 360° Walkthrough & Panorama
  • Navigation Tools & Keyboard Shortcuts Cheat Sheet

Real-World Preview

1
  • 3D Visualization, 360° Walkthrough & Panorama

Workspace Navigation

2
  • Navigation Tools & Keyboard Shortcuts Cheat Sheet
  • 3D Visualization, 360° Walkthrough & Panorama

Interior Design

5
  • Furniture & Decor
  • Zlendo Realty AI Inspiration Tools
  • Editor Tour: Introducing the Project Workspace
  • 2D Floor Planner: Drawing or Editing in the Zlendo Realty Workspace
  • 3D Visualization, 360° Walkthrough & Panorama

AI Inspiration

2
  • Zlendo Realty AI Inspiration Tools
  • Editor Tour: Introducing the Project Workspace

Export Plan

1
  • Export Plan & Floorplan Generator Tool

Projects

10
  • 2D Floor Planner: Drawing or Editing in the Zlendo Realty Workspace
  • Creating New Projects
  • Find & Manage Projects
  • Editor Tour: Introducing the Project Workspace
  • 3D Visualization, 360° Walkthrough & Panorama
  • Navigation Tools & Keyboard Shortcuts Cheat Sheet
  • Zlendo Realty AI Inspiration Tools
  • Furniture & Decor
  • Zlendo Realty Cost Estimation Tool
  • Export Plan & Floorplan Generator Tool

FAQ

1
  • Zlendo Realty FAQ

Project Workspace Settings

1
  • Editor Tour: Introducing the Project Workspace

Community

2
  • Export Plan & Floorplan Generator Tool
  • Zlendo Realty Community: Creating Project Templates & Sharing Designs

Project Workspace

9
  • Editor Tour: Introducing the Project Workspace
  • Navigation Tools & Keyboard Shortcuts Cheat Sheet
  • 2D Floor Planner: Drawing or Editing in the Zlendo Realty Workspace
  • 3D Visualization, 360° Walkthrough & Panorama
  • Zlendo Realty AI Inspiration Tools
  • Zlendo Realty Cost Estimation Tool
  • Zlendo Realty Render Tool
  • Zlendo Realty Vastu Tool
  • Export Plan & Floorplan Generator Tool

Share Designs

2
  • Export Plan & Floorplan Generator Tool
  • Zlendo Realty Community: Creating Project Templates & Sharing Designs

2D Drawing & Editing

6
  • 2D Floor Planner: Drawing or Editing in the Zlendo Realty Workspace
  • Editor Tour: Introducing the Project Workspace
  • Navigation Tools & Keyboard Shortcuts Cheat Sheet
  • Zlendo Realty Render Tool
  • Zlendo Realty Cost Estimation Tool
  • Export Plan & Floorplan Generator Tool

Creating New Projects

1
  • Creating New Projects

Find Projects

1
  • Find & Manage Projects

Manage Projects

2
  • Find & Manage Projects
  • Export Plan & Floorplan Generator Tool

Create Templates

2
  • Export Plan & Floorplan Generator Tool
  • Zlendo Realty Community: Creating Project Templates & Sharing Designs
View Categories
  • Home
  • Docs
  • Version 2.0: Zlendo Realty Editor
  • 2.0 Version 3D Elevation Export

2.0 Version 3D Elevation Export

5 min read

2.0 Version: 3D Elevation Export #

Elevation / Section Modes #

The Elevation / Section Modes feature allows users to generate professional building elevations and sectional drawings from the 3D model.

Different export modes are available to create technical, presentation-ready, and material-focused views for documentation, construction, and client presentations.
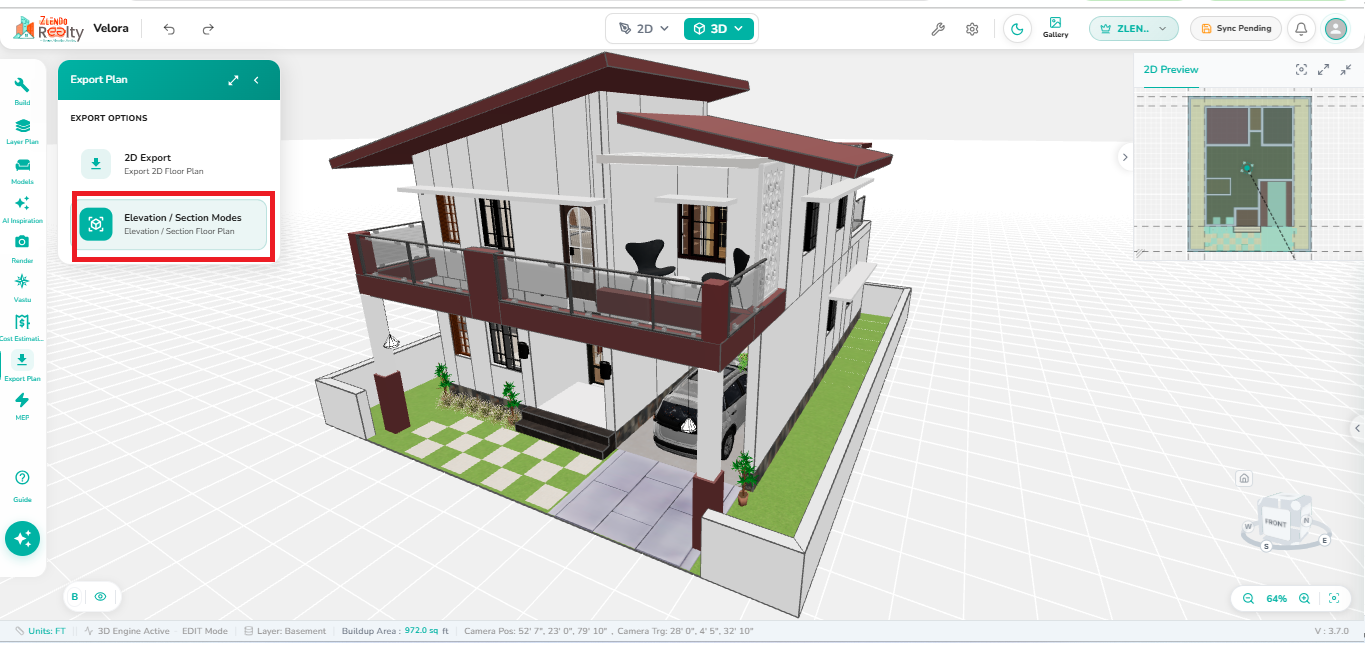
Export Plan panel displaying the Elevation / Section Modes option, allowing users to generate elevation and section drawings from the 3D building model. The workspace includes a 3D model preview and a 2D floor plan overview panel.

1. Accessing Elevation / Section Modes #

Steps

  1. Open the Export Plan panel.
  2. Select Elevation / Section Modes.
  3. Choose the required elevation or section export type from the left panel.
  4. The selected drawing is generated in the workspace.
  5. Use the available customization tools and export options as needed.
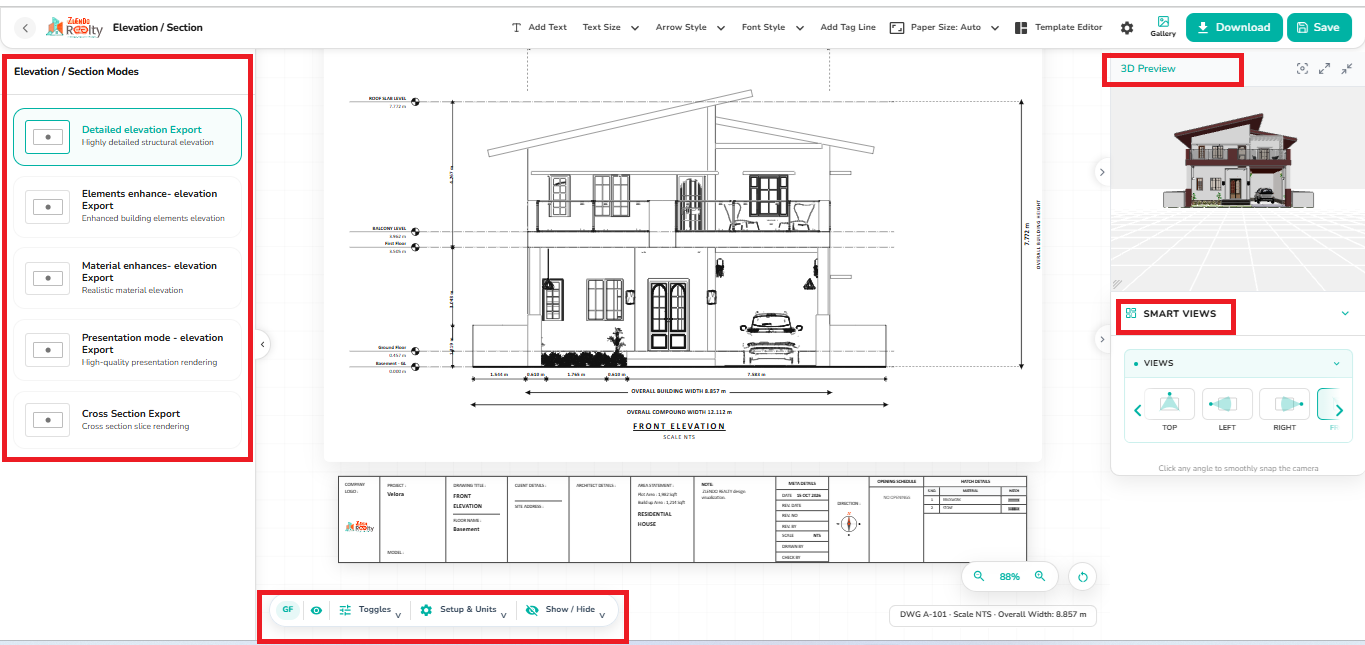
Elevation / Section Modes workspace displaying multiple elevation and section export options, a detailed front elevation drawing, and a 3D preview panel with smart view controls.

2. Detailed Elevation Export #

Generates a detailed architectural elevation containing dimensions, levels, structural outlines, and building annotations suitable for technical documentation and construction drawings.
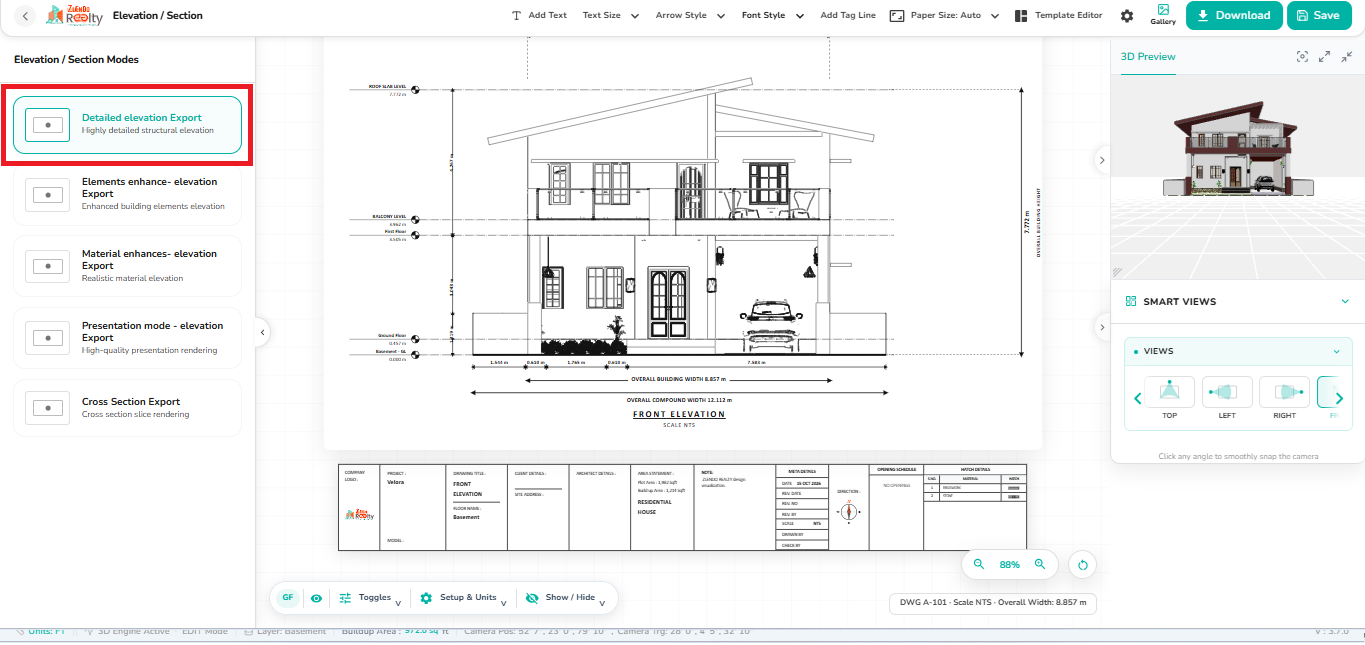
Detailed elevation view displaying a fully dimensioned architectural building elevation with annotations, levels, and structural details.

Steps

  1. Select Detailed Elevation Export.
  2. Choose the required building side or smart view.
  3. Review dimensions, annotations, and level markers.
  4. Customize the drawing if required.
  5. Save or download the elevation.

3. Elements Enhanced Elevation Export #

Highlights architectural elements such as doors, windows, balconies, railings, columns, and façade details for improved visibility and drawing clarity.
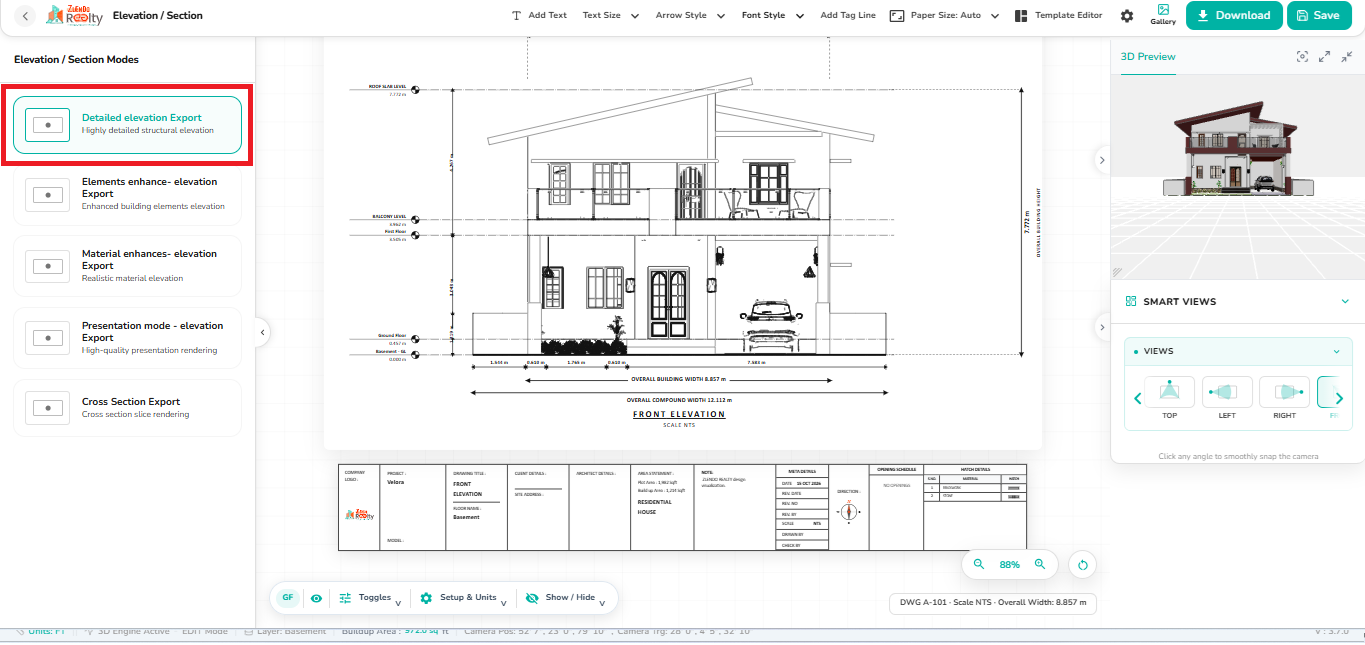
Front elevation drawing showing doors, windows, balconies, columns, and railings, with Detailed Elevation Export selected in the attached example.

Steps

  1. Select Elements Enhance – Elevation Export.
  2. Review the highlighted building elements.
  3. Verify the visibility of architectural components.
  4. Adjust drawing settings if needed.
  5. Save or export the drawing.

Isometric View Selection #
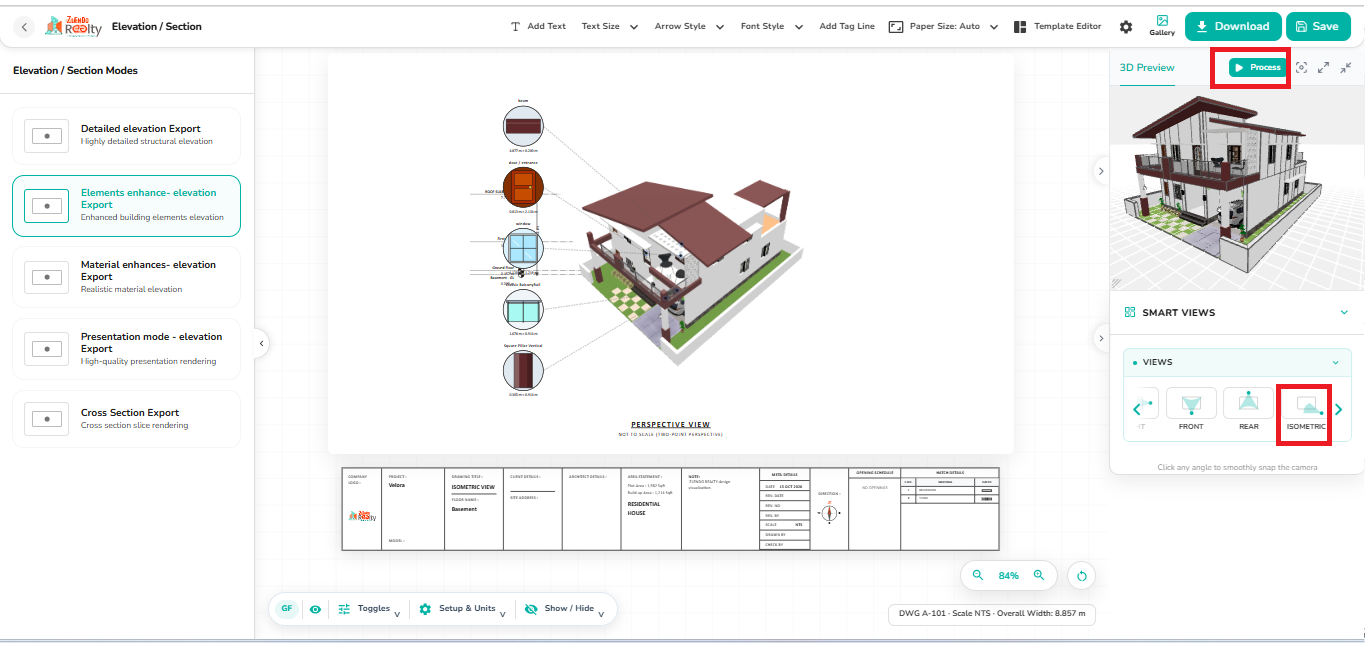
Smart Views panel showing the Isometric view selected, with a synchronized 3D preview of the building model displayed for perspective elevation generation.

Steps

  1. Open the Smart Views panel in the Elevation / Section workspace.
  2. Click Isometric from the available view options.
  3. The building model is displayed in Isometric View within the 3D Preview panel.
  4. Review the initial perspective of the model.
  5. Prepare the model for further orientation adjustments if required.

Update a Custom Isometric Perspective #

Steps

  1. Select Isometric from the Smart Views panel.
  2. Rotate the building model in the 3D Preview panel to the desired direction or angle.
  3. Verify the required perspective in the preview window.
  4. Click Process.
  5. The export drawing is automatically regenerated using the current 3D preview orientation.
  6. Review the updated perspective view in the drawing workspace.
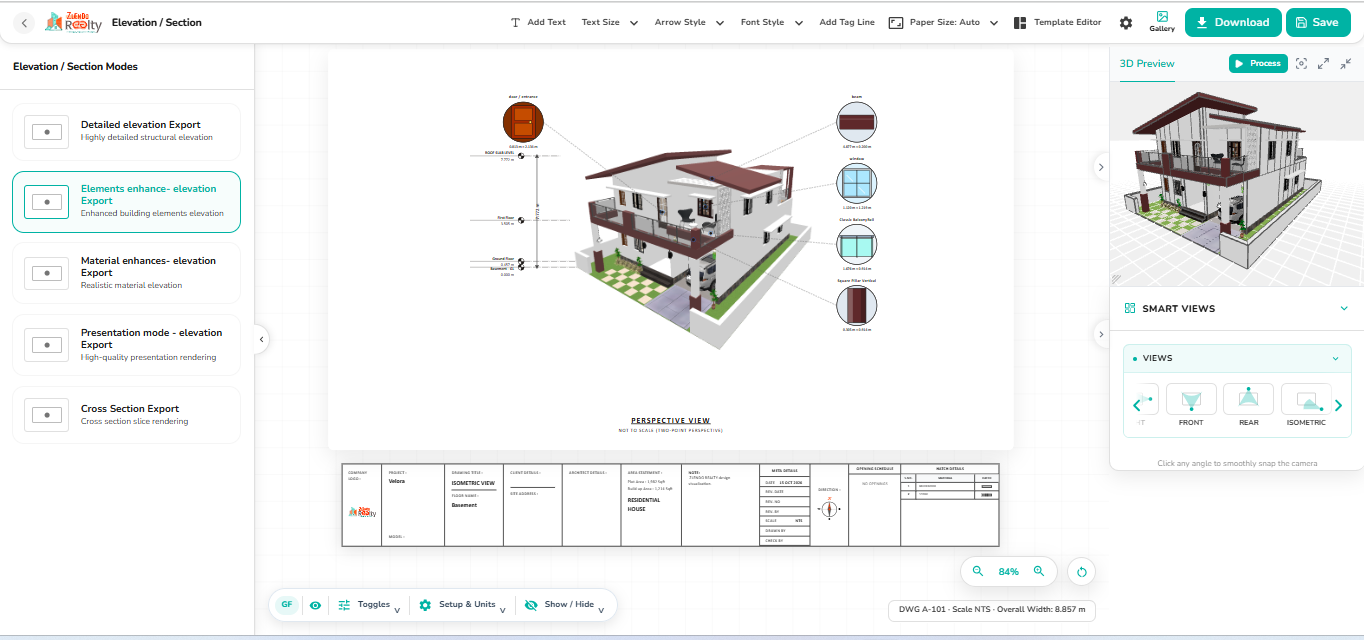
Elements-enhanced elevation export regenerated as a perspective view, with architectural element callouts and the current building orientation shown in the 3D Preview panel.

4. Material Enhanced Elevation Export #

Displays material finishes, textures, wall treatments, roof materials, and façade details to create realistic elevation drawings.
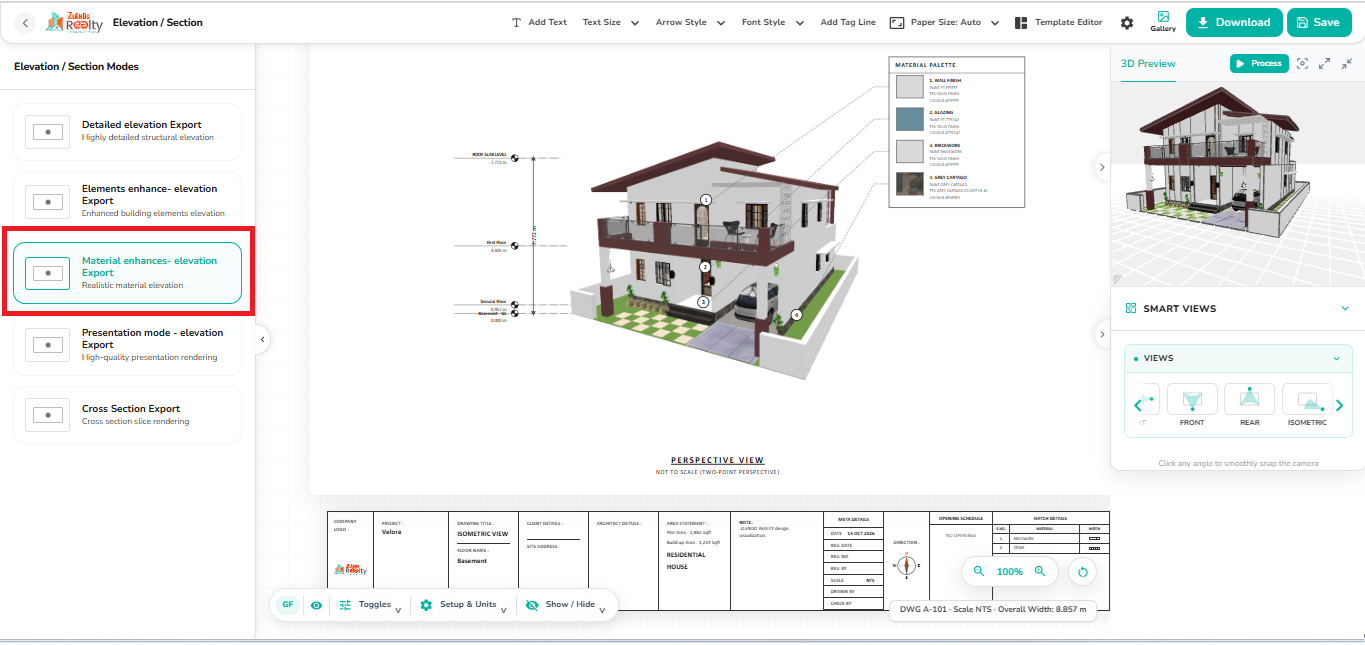
Material-enhanced elevation view displaying realistic façade finishes, wall textures, and roof materials.

Steps

  1. Select Material Enhances – Elevation Export.
  2. Review the applied materials and finishes.
  3. Verify texture representation.
  4. Adjust presentation settings if required.
  5. Save or download the elevation.

5. Presentation Mode – Elevation Export #

Creates a visually enhanced elevation suitable for client presentations, approvals, and project reviews.
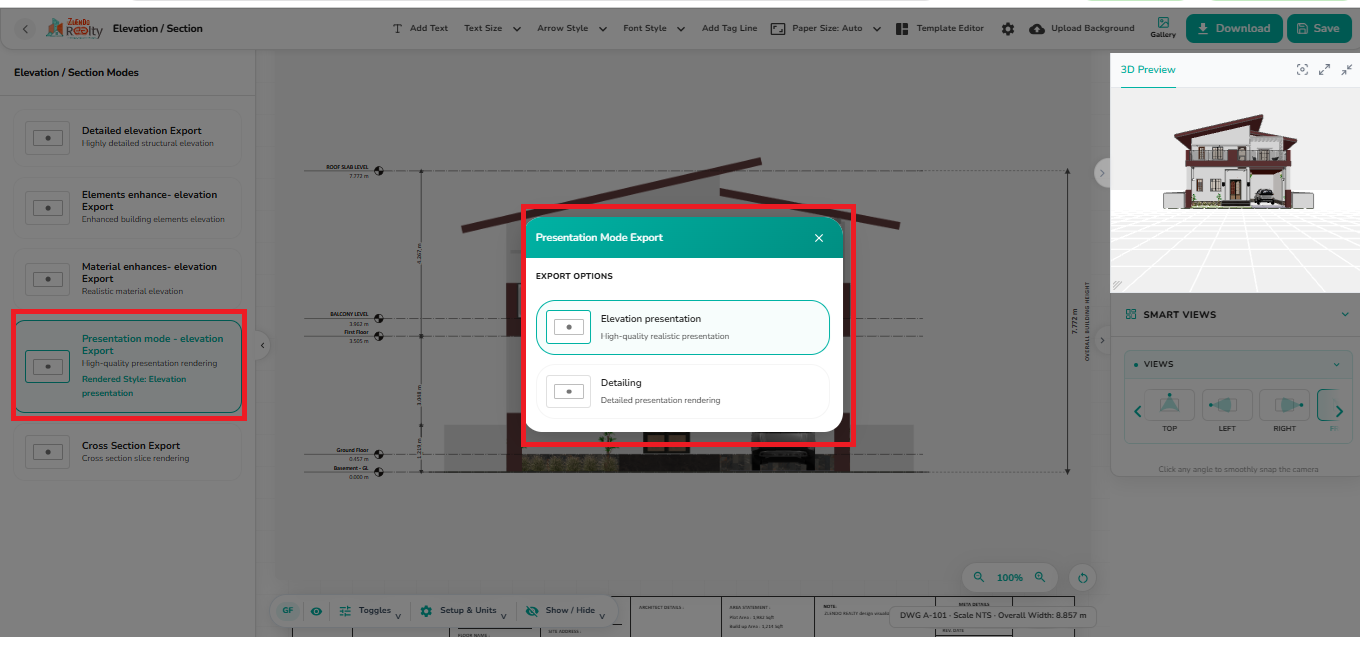
Presentation Mode Export dialog displaying two rendering options, Elevation Presentation and Detailing, for generating presentation-quality elevation views.

Steps for Presentation Mode Export #

  1. Navigate to Export Plan → Elevation / Section Modes.
  2. Select Presentation Mode – Elevation Export.
  3. Choose either Elevation Presentation or Detailing.
  4. Use the 3D Preview panel to verify the building orientation.
  5. Select a preferred angle from Smart Views or rotate the model manually.
  6. Click Process to update the drawing based on the current preview.
  7. Customize the drawing using annotation and template tools if required.
  8. Click Save to store the drawing.
  9. Click Download to export the final presentation output.

Elevation Presentation View #

Provides a realistic, presentation-ready elevation view that highlights the building’s overall appearance, colors, and architectural design.
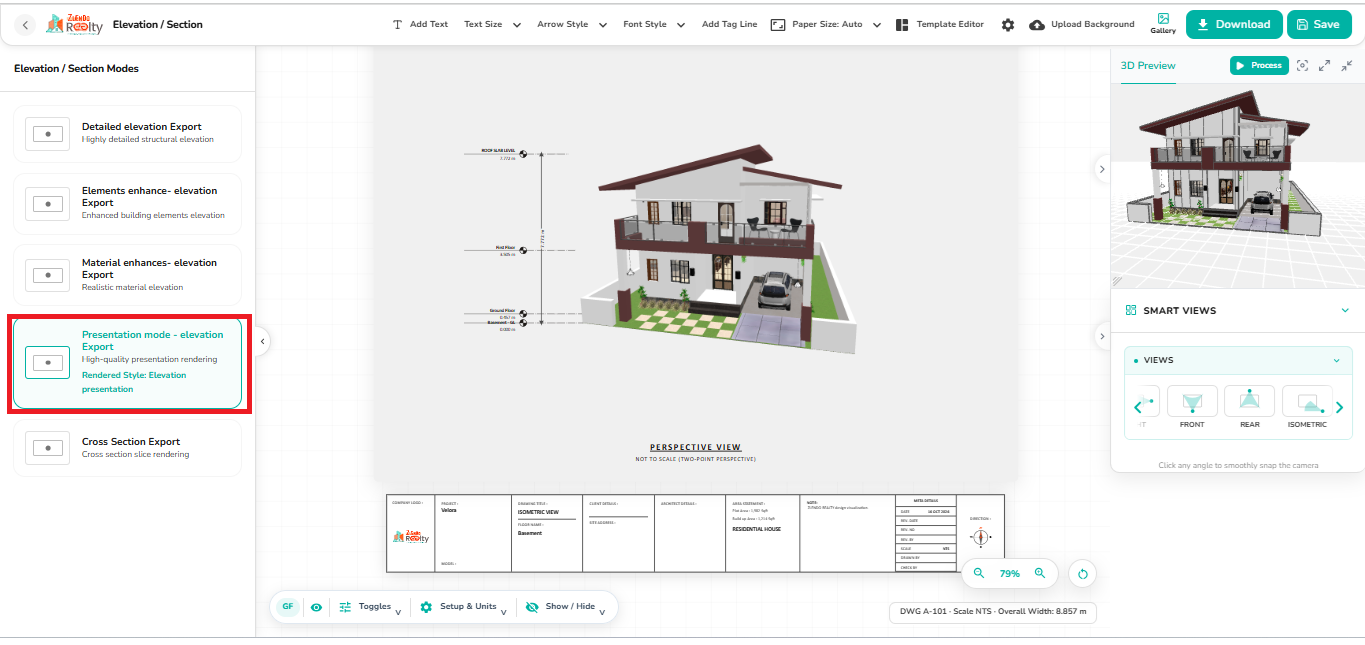
Presentation Mode Elevation Export displaying a realistic rendered building elevation with architectural level markers and a presentation-ready layout.

Detailing View #

Provides a detailed elevation view with material specifications, finish legends, and architectural detailing for design review and documentation.
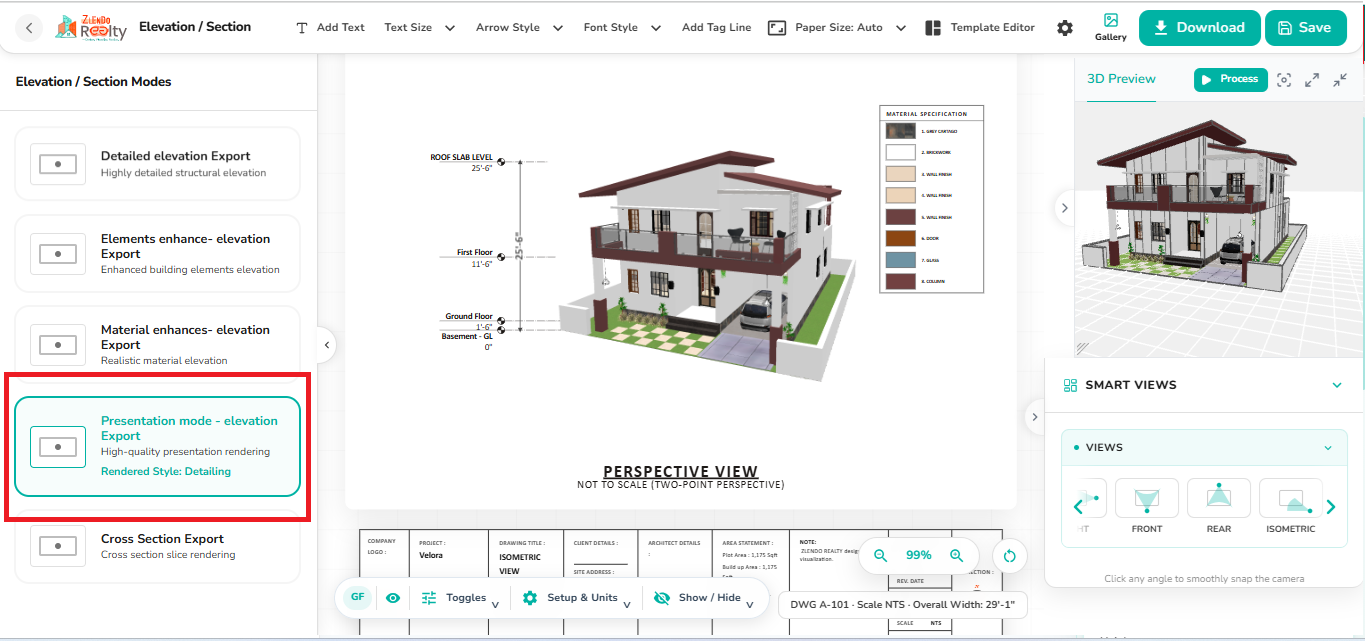
Presentation Mode Detailing view displaying a rendered building elevation with material specification legends and detailed presentation information.

6. Cross Section Export #

Allows users to generate sectional views of the building by cutting through the model and displaying internal architectural and structural details.

Four rendering styles are available to create section drawings suitable for technical documentation, presentations, conceptual reviews, and design visualization.

Available Cross Section Styles #

  • Technical: Displays detailed section drawings with hatch patterns, material shading, dimensions, and construction information.
  • Presentation: Provides a clean, realistic section view with colors and enhanced visual appearance for presentations.
  • Monochrome View: Generates a high-contrast black-and-white section drawing optimized for printing and documentation.
  • Pencil Sketch: Creates a hand-drawn styled section rendering for conceptual presentations and design discussions.
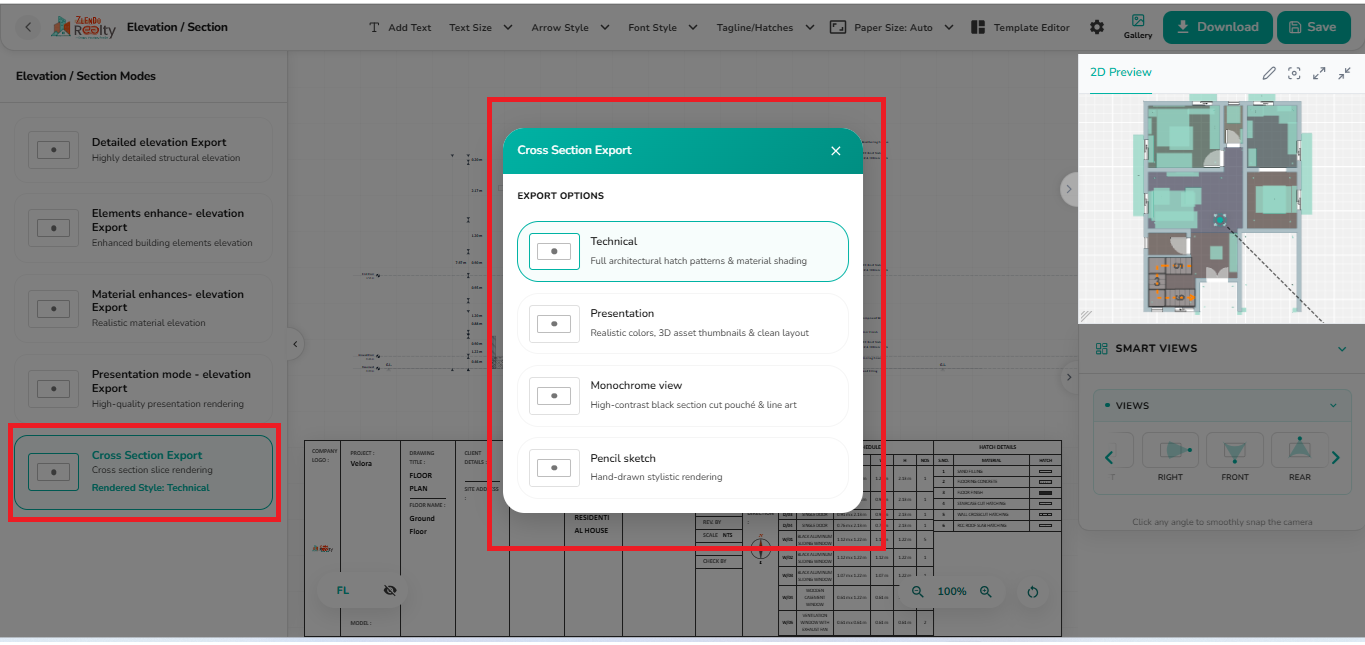
Cross Section Export options dialog displaying four rendering styles: Technical, Presentation, Monochrome View, and Pencil Sketch for generating section drawings with different visual representations.

7. Elevation / Section Workspace #

The Elevation / Section workspace enables users to generate, annotate, customize, and export detailed elevation and sectional views of the building.

It provides multiple export modes, annotation tools, 3D preview, view navigation, and export options for creating professional construction drawings and presentation documents.
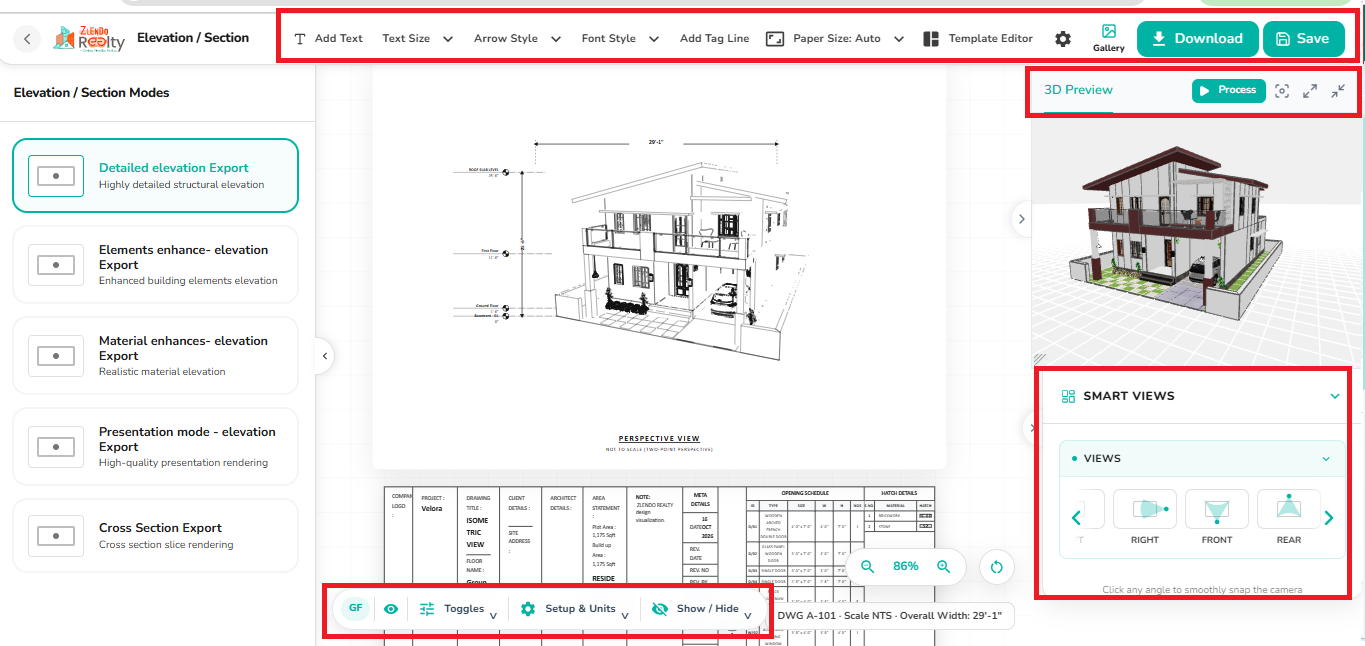
Elevation/Section workspace displaying elevation and cross-section export modes, annotation toolbar, drawing sheet preview, 3D preview panel, Smart Views navigation controls, and project export settings.

Elevation / Section Modes #

Select the required view generation mode based on the desired output.

  • Detailed Elevation Export: Creates highly detailed structural elevation drawings.
  • Elements Enhanced Elevation Export: Highlights architectural and building elements in elevation views.
  • Material Enhanced Elevation Export: Applies material-based visualization for realistic elevations.
  • Presentation Mode – Elevation Export: Generates high-quality presentation-ready elevation views.
  • Cross Section Export: Creates sectional drawings by slicing through the building model.

Steps

  1. Open the Elevation / Section workspace.
  2. Select the required export mode.
  3. Generate the drawing view.
  4. Review and customize the output before saving.

Annotation & Drawing Toolbar #

Add notes, dimensions, labels, and drawing annotations to elevation and section views.

Available Tools

  • Add Text
  • Text Size
  • Arrow Style
  • Font Style
  • Add Tag Line
  • Paper Size
  • Template Editor
  • Settings
  • Gallery

Steps

  1. Select the required annotation tool.
  2. Click within the drawing area.
  3. Customize the annotation settings.
  4. Apply changes to the drawing sheet.

3D Preview Panel #

Displays a 3D model preview corresponding to the generated elevation or section view.

Steps

  1. Review the model in the 3D Preview panel.
  2. Use zoom and view controls to inspect the model.
  3. Click Process to regenerate the export drawing from the current preview orientation.

Smart Views #

Quickly switch between predefined building viewpoints.

  • Right View
  • Front View
  • Rear View
  • Additional directional views

Steps

  1. Open the Smart Views panel.
  2. Select the desired view angle.
  3. Review the updated model orientation. Use Process to regenerate the export drawing when required.

Drawing Controls #

Manage view settings and drawing display options.

  • Floor Selection
  • Toggle Options
  • Setup & Units
  • Show / Hide Elements
  • Zoom Controls
  • View Refresh

Steps

  1. Select the required control.
  2. Adjust drawing visibility or units.
  3. Review the updated drawing output.

Save and Export #

Save project changes or export elevation and section drawings.

Steps

  1. Click Save to store the current work.
  2. Click Download to export the drawing.
  3. Select the preferred output format.
  4. Download the generated file.

Note #

Use Smart Views and 3D Preview together to verify the model orientation before generating or exporting elevation and section drawings.

Updated on October 16, 2026

What are your Feelings

  • Happy
  • Normal
  • Sad

Share This Article :

  • Share
  • Facebook
  • X
  • LinkedIn
  • Pinterest
2.0 Version 2D Export2.0 Version MEP and Structural

Powered by BetterDocs

Leave a Reply Cancel reply

Your email address will not be published. Required fields are marked *

Table of Contents
  • 2.0 Version: 3D Elevation Export
    • Elevation / Section Modes
    • 1. Accessing Elevation / Section Modes
    • 2. Detailed Elevation Export
    • 3. Elements Enhanced Elevation Export
      • Isometric View Selection
      • Update a Custom Isometric Perspective
    • 4. Material Enhanced Elevation Export
    • 5. Presentation Mode - Elevation Export
      • Steps for Presentation Mode Export
      • Elevation Presentation View
      • Detailing View
    • 6. Cross Section Export
      • Available Cross Section Styles
    • 7. Elevation / Section Workspace
      • Elevation / Section Modes
      • Annotation & Drawing Toolbar
      • 3D Preview Panel
      • Smart Views
      • Drawing Controls
      • Save and Export
      • Note

Create your account today

Experience the future of AI home design for free.

Get Started
Zlendo Realty Logo

The world's first Design-to-Sales engine. Experience your space in 360° ultra-realistic 8K, AR/MR.

EINShield VAPT Secured

VAPT Secured

Products

  • AI Floor Planner
  • 2D to 3D Converter
  • Smart Room Styler
  • Interiors & Exteriors
  • Smart Cost Estimator
  • Vastu Optimizer
  • Realistic Renders
  • Virtual Walkthrough
  • See all Products →

Services

  • Floor Plan Design
  • 2D to 3D Conversion
  • Interior Design
  • Vastu Consultation
  • Virtual Walkthrough

Use Cases

  • Home Remodeling
  • Interior Design
  • Vastu Optimization
  • New Home Building
  • Commercial Spaces
  • Builder & Promoter
  • NRI & Remote Planning
  • Developer Solutions
  • Zlendo Realty API Suite

Resources

  • Design Library
  • Pre-built Templates
  • Blog
  • Tutorials
  • Help Center
  • News
  • Grow with Zlendo
  • Contact Us
  • About Us

Legal & Policies

  • General Terms
  • Community Guidelines
  • NDA For Vendors
  • Refund & Cancellation Policy
  • Service Level Agreement

Compare

  • Zlendo vs Foyr Neo
  • Zlendo vs Roomsketcher
  • Zlendo vs Coohom

Copyright © 2026 Zlendo Technologies Pvt. Ltd. | All Rights Reserved.

Cookie PolicyTerms & ConditionsPrivacy Policy
Contact Us